
I did some work over the holidays, not too much, I ate a lot, I didn't waste any time with the car LoL
You are using an out of date browser. It may not display this or other websites correctly.
You should upgrade or use an alternative browser.
You should upgrade or use an alternative browser.
2010 seized engine?
- Thread starter VladM
- Start date
Disclaimer: Links on this page pointing to Amazon, eBay and other sites may include affiliate code. If you click them and make a purchase, we may earn a small commission.


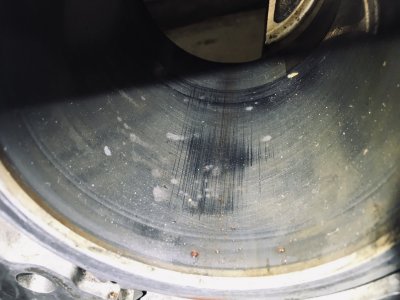
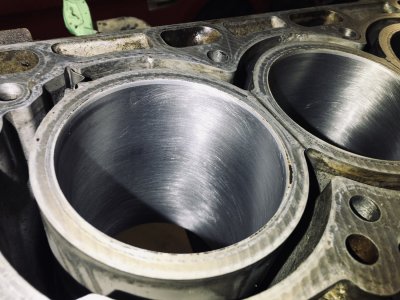
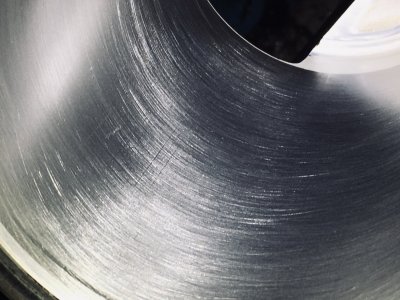
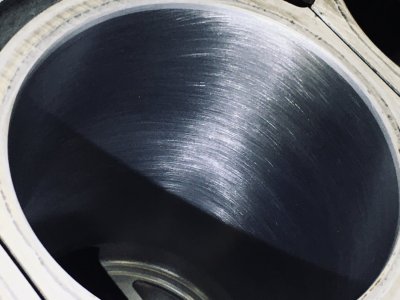
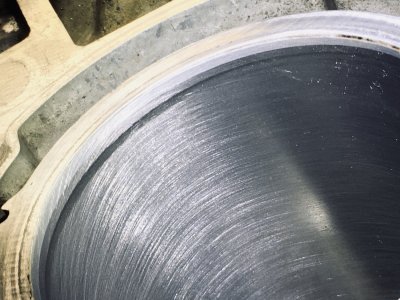
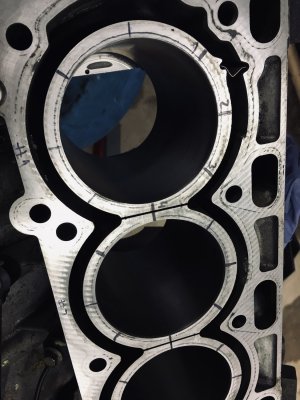
Finally some time to make some progress. Today is to deglaze cylinders and get that crosshatch. What I'm not sure about is:
1/ if I can leave those black rings on top of the cylinder. Everything is getting nice and touched by the stones but this. The compression ring shouldn't be that high up I believe so it shouldn't be a problem. I don't wanna take too much material off...
2/ I hope it is visible but I also still have a tiny vertical scratches in there. Very tiny. It was way worse before. I can't feel them with the finger nail though.
Thoughts? Should I run the stones until everything is looking the same? My goal here is to put together a fairly good running engine on a budget.
Attachments
-
 E85D1770-59B7-4248-96BA-CD38234CD4FA.jpeg233.3 KB · Views: 13
 -
 4B9E970E-89CA-4DE4-8A89-22208BDE3701.jpeg302 KB · Views: 13
 -
 033B5A37-4F11-4C55-84DB-23D413D477FA.jpeg267.6 KB · Views: 13
 -
 360789FD-9301-4344-B121-A908F9A8FCB0.jpeg215.6 KB · Views: 11
 -
 1329427C-D489-4A1C-BA8F-EA9B5E8065BA.jpeg303.5 KB · Views: 18
I measured it today and I'm not happy with the results. Even when most of it is kinda within the limits, few measurements are off the limit a bit. I used 3 stone hone tool and I need something better or I have to send it to the shop.
I measured everything at 3 spots and 2 axes like 15mm from the top, 50mm from the top and 80mm from the top (stroke value is 86 so I chose 80) then I rotated my gauge 90 deg angle and again top middle and bottom.
I can have a 0.0005 inch range for the cylinder bore roundness and a 0.0004 (for every 1 inch) for taper.
2 worst cylinder look like this (1st column for #1 and 2nd column for #4):
#1..........#4
0.0022, 0.0025
0.0012, 0.0017
0.0011, 0.0016
and when switched 90 deg:
0.0024, 0.0021
0.0012, 0.0015
0.0012, 0.0013
Okay there's too many numbers but lomg story short the roundness isn't bad at all but the taper on top compare to the middle worries me and I have to do something about it. That taper on top is the worst especially for a turbo charged engines because I can lost a lot of power at the top rev when the piston rings would travel from pretty tight bottom and middle part into the top part and all of the sudden it's way bigger diameter, they wouldn't compensate that difference so quickly, couldn't expand so quickly, they wouldn't seal properly. I'd be losing compression and game over...
Edit: those numbers are whatever the gauge showed me after I zeroed it (the difference between the bore size by the manual and the real size)
Last edited:
351Blueblood
Member
- Joined
- Jan 5, 2018
- Messages
- 42
- Reaction score
- 23
Just a FYI your cross hatching is to shallow. Your not fast enough up and down while honing.
That was my first try. I did it one more time and almost all imperfections on the surface are gone and with a nice cross hatch I believe but I took too much material off of the top, that's why the taper. I'm looking for Lisle 15000 to even that out.
FrankK
SHO Member
Hi VladM,
You might want to check out this thread. a lot of good info about checking your cylinder measurements from people that know what they are talking about.
 shoforum.com
Frank
You might want to check out this thread. a lot of good info about checking your cylinder measurements from people that know what they are talking about.
piston ring swap with engine in car
2010 with fried rings on cyl5(front bank). Was planning on an engine swap, but decided on ring replacement. Was told it’s doable with engine in the car, and i’d like to try. So I’ve got to remove intake manifold, valve covers, timing cover, oil pan, and the RH head. Along with crank pulley and...
Frank
Thank you. A lot of forum war in there but I learned something as wellHi VladM,
You might want to check out this thread. a lot of good info about checking your cylinder measurements from people that know what they are talking about.
piston ring swap with engine in car
2010 with fried rings on cyl5(front bank). Was planning on an engine swap, but decided on ring replacement. Was told it’s doable with engine in the car, and i’d like to try. So I’ve got to remove intake manifold, valve covers, timing cover, oil pan, and the RH head. Along with crank pulley and...
Frank
luigisho
SHO Member
Lol! that is light forum war. Thankfully, these things flare up now and then and usually resolve themselves quickly. unless...Thank you. A lot of forum war in there but I learned something as well

I made a mistake by using that 3 stone hone for my engine. It's really good just for deglazing if the cylinder wall is within spec. My wasn't. It has taper and it has out of round. What was I thinking?... Now it has more taper. Not happy but learned a lesson the hard way.
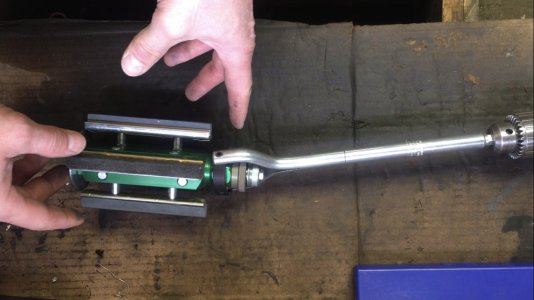
So I bought this Lisle 15000 with 80 and 180 stones. I should've used this rigid hone from the beginning. I had to make those stones straight to each other, there was almost 1 mm difference in distance between the top and the bottom. They provide a little wooden stick with a rough grid sand paper on it. I installed 180.
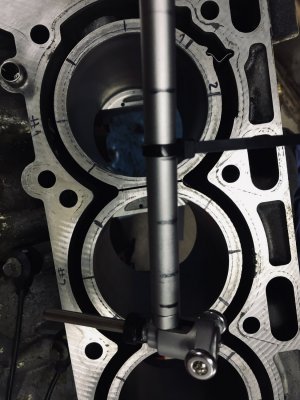
After that I measured all cylinders in 6 spots from the top to the bottom. See picture. 1st at 5mm from the top of the block, then every 25 mm. The 2nd mark I made between 5 and 25 mm mark because that's where the taper is the worst. So I wanted to see it hiw bad it is in that top area of the cylinder wall. I measured where is the piston groove for the 1st ring and it's about 8mm, so that's why I chose 5mm as a first mark. That measurement gave me not just values from axis X and Y but also from 2 more which gave me a better picture about the shape of the cylinder. You don't wanna see those numbers...they're bad. I'd probably need an oversize pistons. I'll post some numbers later.
Just a FYI - I made some marks on my dial gauge indicator (every 25 mm) and I used a zip tie. I wanted to make those multiple measurements easier and faster and accurate as possible at the same time. Simply put measure it always at the same spot. When I inserted the dial gauge inside the cylinder I lined it up with nr 1 mark, and that zip tie worked as a stopper. Then the same for nr 2 to 4, went to next cylinder. Then I moved the zip tie to the next mark, and measured again.
That Lisle 15000 compare to that 3 stone hone is like a day and night. No surprise. It's rigid. It evened out the out of round after few minutes of work. I started with cylinder nr.1 but didn't finish it, it was too late already. Now I'll measure all pistons, re-measure cylinders, m put all those numbers together and will see. But I'm pretty sure I'll need a new set of oversize pistons and rebore the block to that size.
I should probably get those pistons first and measure them before reboring, just to play safe, right?
So I bought this Lisle 15000 with 80 and 180 stones. I should've used this rigid hone from the beginning. I had to make those stones straight to each other, there was almost 1 mm difference in distance between the top and the bottom. They provide a little wooden stick with a rough grid sand paper on it. I installed 180.
After that I measured all cylinders in 6 spots from the top to the bottom. See picture. 1st at 5mm from the top of the block, then every 25 mm. The 2nd mark I made between 5 and 25 mm mark because that's where the taper is the worst. So I wanted to see it hiw bad it is in that top area of the cylinder wall. I measured where is the piston groove for the 1st ring and it's about 8mm, so that's why I chose 5mm as a first mark. That measurement gave me not just values from axis X and Y but also from 2 more which gave me a better picture about the shape of the cylinder. You don't wanna see those numbers...they're bad. I'd probably need an oversize pistons. I'll post some numbers later.
Just a FYI - I made some marks on my dial gauge indicator (every 25 mm) and I used a zip tie. I wanted to make those multiple measurements easier and faster and accurate as possible at the same time. Simply put measure it always at the same spot. When I inserted the dial gauge inside the cylinder I lined it up with nr 1 mark, and that zip tie worked as a stopper. Then the same for nr 2 to 4, went to next cylinder. Then I moved the zip tie to the next mark, and measured again.
That Lisle 15000 compare to that 3 stone hone is like a day and night. No surprise. It's rigid. It evened out the out of round after few minutes of work. I started with cylinder nr.1 but didn't finish it, it was too late already. Now I'll measure all pistons, re-measure cylinders, m put all those numbers together and will see. But I'm pretty sure I'll need a new set of oversize pistons and rebore the block to that size.
I should probably get those pistons first and measure them before reboring, just to play safe, right?
Attachments
Last edited:
Like I said I bought a rigid Lisle 15000 with a 80 and 180 grid stones. I'm working on resizing the cylinder walls for 0.25mm oversize pistons with the 80 grid stones, due to taper, out of round and caving. I hone it dry and it's very dusty. You can hone it wet as well.
I made few mistakes, I learned everytime something new though, I fixed it. Still some room for error though. And my plan B still in place if I mess it up. But it's fun to do it home myself instead of sending the block to the shop, which is my plan B actually.
It's a lot of patience and measurements, insert the hone in to the cylinder, do couple of strokes, remove the hone, measure it, lot of adjustings of the stones, they have to be perfectly parallel, it is a pain until you get them work like they suppose to. I'm glad it's a 6 cylinder so when I mess something up on nr.1 I go to nr.2 and try something else some other adjustment and so on and on again until I figure it out and I get back to nr1 and fix it.
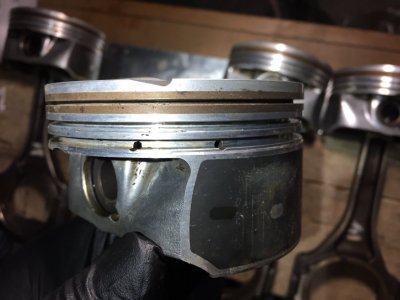
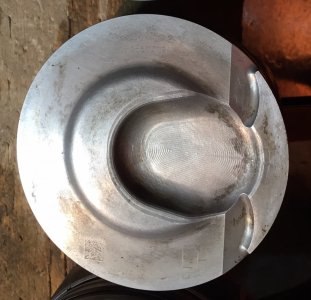
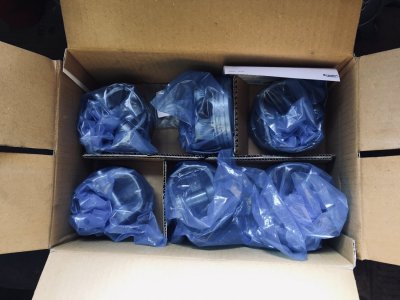
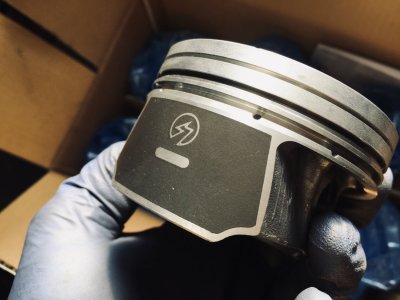
My new pistons finally arrived. Ready for some measurements and final cylinder wall honing with 80 until I get really close and then switch to 180.
I made few mistakes, I learned everytime something new though, I fixed it. Still some room for error though. And my plan B still in place if I mess it up. But it's fun to do it home myself instead of sending the block to the shop, which is my plan B actually.
It's a lot of patience and measurements, insert the hone in to the cylinder, do couple of strokes, remove the hone, measure it, lot of adjustings of the stones, they have to be perfectly parallel, it is a pain until you get them work like they suppose to. I'm glad it's a 6 cylinder so when I mess something up on nr.1 I go to nr.2 and try something else some other adjustment and so on and on again until I figure it out and I get back to nr1 and fix it.
My new pistons finally arrived. Ready for some measurements and final cylinder wall honing with 80 until I get really close and then switch to 180.
Attachments
Last edited:
luigisho
SHO Member
I would say almost always yes. Measure twice cut once is the old adage that applies to alot of things. I appreciate the DIY work on this and knowing that in the end you have a backup. Education usually costs something - money, busted knuckles, blood, tools etc.I should probably get those pistons first and measure them before reboring, just to play safe, right?
I started with one cylinder and piston. It didn't work well. I stopped, had to go to work...I would say almost always yes. Measure twice cut once is the old adage that applies to alot of things. I appreciate the DIY work on this and knowing that in the end you have a backup. Education usually costs something - money, busted knuckles, blood, tools etc.
It's called a mental, right, when you do your best and it just doesn't work the way you expect.
80 stones worked really well without any big pressure, barely medium actually, and those thousands of an inch went down nicely. Until, until I got to the point where I need to take 0.003 inch to get to exact the piston size. Now I'm stuck there like I hit a diamond or something. It goes very very slow and with more pressure then usual.
Is there a softer sleeve or coating on those walls or my stones just gave up on me, I don't know. I'm not enjoying it at all. I mean I can put some sweat into it, but once you see the progress on first few thousands and then a way different ball game, likr, come on...
luigisho
SHO Member
Your are deeper than I would go with a modern tight tolerance engine. I would have paid a machine shop or located a used replacement-- unless I had alot of time and desire to learn this. I am watching to see how everything turns out. I wish you much success.
Thanks a lot!Your are deeper than I would go with a modern tight tolerance engine. I would have paid a machine shop or located a used replacement-- unless I had alot of time and desire to learn this. I am watching to see how everything turns out. I wish you much success.
I have plenty of time but I wanna get it back on the road this year, ehm.
I'll give it another try another day with a different cylinder and will see what happens. If it's the same story, I'll probably send it to the shop.
I contacted Lisle they don't know why the stones stopped working. They suggested wet honing. I'll try that.
I also tried to find out what exact material is the cylinder made of especially if there's any different material used as coating. All I got so far is a cast iron sleeves. Ford uses some plasma technology on aluminum but that should not be the case for these ecoboostd from 2009 to 15-17 ish era.
I also tried to find out what exact material is the cylinder made of especially if there's any different material used as coating. All I got so far is a cast iron sleeves. Ford uses some plasma technology on aluminum but that should not be the case for these ecoboostd from 2009 to 15-17 ish era.
luigisho
SHO Member
I saw this for f150 ecoboost and assume the technology is the same for this iteration of ecoboost. i did see iron pressed sleeves for the 1.6 ecoI contacted Lisle they don't know why the stones stopped working. They suggested wet honing. I'll try that.
I also tried to find out what exact material is the cylinder made of especially if there's any different material used as coating. All I got so far is a cast iron sleeves. Ford uses some plasma technology on aluminum but that should not be the case for these ecoboostd from 2009 to 15-17 ish era.
Ford Team Given 2009 National Inventor of the Year Award for Plasma Transferred Wire Arc Engine Coating Technology
Application of PTWA Coating to Ford ZETEC 1.4 Liter VCT Engine. Click to enlarge. The Intellectual Property Owners Education Foundation is awarding the inventors of the Ford-patented Plasma Transferred Wire Arc (PTWA) technology used to apply coatings on engine cylinder bores the 2009 National...
www.greencarcongress.com
this article says steel pressed in sleeves? Now I am confused

3.5L EcoBoost Engine - In-Depth Look at Design and Reliability
What is the 3.5L EcoBoost Engine? Is it good or bad? Learn about Ford 3.5L EcoBoost Engine design, specs, features, relaibility, and its the most common problems.
www.motorreviewer.com
I would send a message to shoblock just to make sure. He know's the engine design and inspected failures etc for Ford.
Last edited:
luigisho
SHO Member
Ok so quoting from SHOBLOCK
"Six sleeves (proprietary iron blend) are inserted into the block permanent mold machine before the mold assembly is closed. Aluminum is then injected (timed by microseconds), thus making the sleeves a permanent part of the casting. 5.Ol V-8's use the coating."
"Six sleeves (proprietary iron blend) are inserted into the block permanent mold machine before the mold assembly is closed. Aluminum is then injected (timed by microseconds), thus making the sleeves a permanent part of the casting. 5.Ol V-8's use the coating."
This sounds just right. Thanks a lot. I love to know how it's all build, know those perks behind the scenes....Ok so quoting from SHOBLOCK
"Six sleeves (proprietary iron blend) are inserted into the block permanent mold machine before the mold assembly is closed. Aluminum is then injected (timed by microseconds), thus making the sleeves a permanent part of the casting. 5.Ol V-8's use the coating."
I never looked closer but yesterday after work I went to garage with a magnet. It worked inside, obviously not on the outside though and when I cleaned up the top of the cyl.wall I saw that material difference, actually. There's a tiny sleeve inside that thicker aluminum wall. I can measure it but it's like not even 2mm of that iron stuff and less than 4mm of aluminum on the outside.
I kinda lost the momentum when I couldn't go wider on that cylinder. My pride is broken I'm giving up, but for a good cause - and I'll let the machine shop do the job and move on. I know though that I got it veeery close and in other cylinder the difference in measurements in the whole cyl.wall top to bottom (and in 4 axes horizontally) are within 0.0002 inch. Pretty satisfying for me for a handwork I've done
")

Similar threads
- Replies
- 11
- Views
- 946
- Replies
- 8
- Views
- 3K
- Replies
- 18
- Views
- 3K