
StealBlueSho
SHO Member
Yup... sooo... couldn't find a thread that explained how to do this.. I googled(Maybe should have altavista'd? or Yahooed? dunno) and found one a VW... which is surprising similar or not so... but here ya go for a 2010 Taurus... I apologize if someone already did a write up....
You will need:
18MM Wrench
T45 Torx Bit or Socket
Flat Head Screw Driver
Smaller wrench to depress schrader valve.. or finger nail..
Eyeballs... hands... etc..
Maybe gloves if you are paranoid like me..
Turn the car off... sorry.. I work with really dumb people sometimes.. myself included..
Pop hood.. etc...
Remove the really spiffy SHO engine cover...
On a COLD engine disconnect the battery...
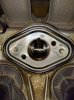
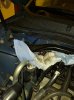
On the passenger side right right under the cowl there is a grey schrader valve cap... remove it.. It is circled in red... and yes.. thats a diaper under it to catch any gas coming out... most absorbent material known to man.. if you have kids... you understand...

Using a smaller wrench or a finger nail, depress the valve to release pressure...I recommend a wrench or philips head screw driver...
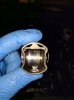
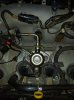
On bank 2 (which is the one close to the radiator) there is a silencer made of foam.. just pull it off with you hands (see required tools above.. and yes.. that includes you)...
You will see the HPFP sitting right under it...

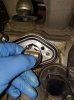
Disconnect the wiring going to it by using a flat blade to lift the tab over the catch..
Loosen and slide the nut down holding the fuel line going to the fuel rail using the 18MMM wrench, its circled in green...
Using the 45T Torx bit/socket alternate loosing the screws on either side circled in red... this is spring loaded, so make sure you alternate sides... you do not want to damage it or cam shaft follower inside...
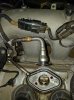
Once those screws are removed, lift the HPFP gently.. it should pop up, and you can rotate it a bit...
Circled in yellow is the quick disconnect fuel line, press the black tab into the line, you should feel or maybe hear a click.. then pull the HPFP away...
Set the HPFP to the side or toss it to the side.. I am assuming you are replacing it...
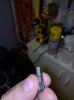
Using your fingers slide the cam shaft follower out.. it should be fairly easy. You are doing this for two reasons... to make sure the follower is not grooved and to make sure the cam shaft is
not grooved.


If they are then shame on you for not doing regular oil changes... but I digress...
Once checked, you can slide it back in, its keyed with a notch so you can't mess it up... align the notch with the dimple and you are good to go..

To install the new HPFP follow in reverse...
NOTE: The nut on the fuel line to the rails, start it before tightening to the fuel pump all the way.. it may not line up correctly otherwise... at least for me...
NOTE: There are two posts to help you alight the HPFP... this is where your eyes comes into play... and also short term memory... if you try to put it in upside.. you should not be tackling this project IMHO...

You will need:
18MM Wrench
T45 Torx Bit or Socket
Flat Head Screw Driver
Smaller wrench to depress schrader valve.. or finger nail..
Eyeballs... hands... etc..
Maybe gloves if you are paranoid like me..
Turn the car off... sorry.. I work with really dumb people sometimes.. myself included..
Pop hood.. etc...
Remove the really spiffy SHO engine cover...
On a COLD engine disconnect the battery...
On the passenger side right right under the cowl there is a grey schrader valve cap... remove it.. It is circled in red... and yes.. thats a diaper under it to catch any gas coming out... most absorbent material known to man.. if you have kids... you understand...
Using a smaller wrench or a finger nail, depress the valve to release pressure...I recommend a wrench or philips head screw driver...
On bank 2 (which is the one close to the radiator) there is a silencer made of foam.. just pull it off with you hands (see required tools above.. and yes.. that includes you)...
You will see the HPFP sitting right under it...
Disconnect the wiring going to it by using a flat blade to lift the tab over the catch..
Loosen and slide the nut down holding the fuel line going to the fuel rail using the 18MMM wrench, its circled in green...
Using the 45T Torx bit/socket alternate loosing the screws on either side circled in red... this is spring loaded, so make sure you alternate sides... you do not want to damage it or cam shaft follower inside...
Once those screws are removed, lift the HPFP gently.. it should pop up, and you can rotate it a bit...
Circled in yellow is the quick disconnect fuel line, press the black tab into the line, you should feel or maybe hear a click.. then pull the HPFP away...
Set the HPFP to the side or toss it to the side.. I am assuming you are replacing it...
Using your fingers slide the cam shaft follower out.. it should be fairly easy. You are doing this for two reasons... to make sure the follower is not grooved and to make sure the cam shaft is
not grooved.
If they are then shame on you for not doing regular oil changes... but I digress...
Once checked, you can slide it back in, its keyed with a notch so you can't mess it up... align the notch with the dimple and you are good to go..
To install the new HPFP follow in reverse...
NOTE: The nut on the fuel line to the rails, start it before tightening to the fuel pump all the way.. it may not line up correctly otherwise... at least for me...
NOTE: There are two posts to help you alight the HPFP... this is where your eyes comes into play... and also short term memory... if you try to put it in upside.. you should not be tackling this project IMHO...
Attachments
-
 IMG_20160722_205306.jpg330.8 KB · Views: 56
 -
 IMG_20160722_205359.jpg149.4 KB · Views: 53
 -
 IMG_20160722_205417.jpg282.3 KB · Views: 52
 -
 IMG_20160722_205453.jpg360.9 KB · Views: 50
 -
 IMG_20160722_210313.jpg290.9 KB · Views: 59
 -
 IMG_20160722_210355.jpg318.9 KB · Views: 56
 -
 IMG_20160722_210441.jpg149.5 KB · Views: 33
 -
 IMG_20160722_210551.jpg140.1 KB · Views: 33
Last edited: