'14SHO
SHO Member
- Joined
- Jan 10, 2017
- Messages
- 224
- Reaction score
- 151
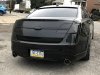
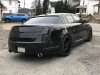
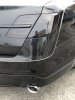
 looking for examples of debadged trunks. Thought about remove the Taurus and the EcoBoost and replacing with a SHO emblem that I’ll add a picture of. Not sure of placement of the SHO badge. Maybe one of the original spots