Coolant Leak

Disclaimer: Links on this page pointing to Amazon, eBay and other sites may include affiliate code. If you click them and make a purchase, we may earn a small commission.

luigisho

SHO Member
Joined
Nov 2, 2001
Messages
13,266
Reaction score
5,143
Location
va beach,va
Those engine pics make me miss my Gen III. But this thread is why I haven't pulled the trigger on another one. Can't lie.. that car was great for years though. Less trouble than any of my Gen I &II's
 

Funmart6

my name is mud
Joined
Apr 2, 2003
Messages
1,286
Reaction score
116
Location
Auburn, Alabama
So the next question that should be asked of anyone owning a 96-99 SHO is "Are the cams welded?". Well, are they?
I believe they were welded by the previous owner. I have owned the car since 2003 and have had the valve covers off once but that was many years ago.

Sent from my SM-S916U using Tapatalk
 

Texas Marauder

Supporting Member
Supporting Member
Joined
Jul 20, 2007
Messages
908
Reaction score
818
Location
Lone Star State
You may be able to see the welds on one cam thru the oil fill. May have to use a borescope. It's been a looong time since I've looked at one.
 

Funmart6

my name is mud
Joined
Apr 2, 2003
Messages
1,286
Reaction score
116
Location
Auburn, Alabama
Today I drained the radiator and removed the reservoir to clean it and just mainly have a look at the condition of it as it is an original black top reservoir. After checking it all out and reinstalling it, I closed off the radiator petcock and poured some Prestone coolant system flush over in the reservoir and installed a spill proof funnel and filled the system with water until the funnel was about half full. I then cranked up the car and let it run. It ran very smooth and the temperature guage climbed to halfway between half and cold and stayed there. After about 10 minutes of running, I saw that funnel was getting low so I added more water to fill it up a little. The temperature guage stayed at the same spot the whole time I was running the engine. I let the engine continue to run and after about 20 minutes I noticed the funnel was filling up and the water was bubbling up and splashing out. I checked the guage and it was still between halfway and cold and then I shut the engine off. With the engine off, I saw the fluid in the funnel drain down into the reservoir so I added more water and then cranked the engine back up. After a few minutes the bubbling started again and the funnel was being filled and fluid was splashing out again, again the temp guage was at the same level it had been at this whole time. I then shut the engine off. Okay so, I am thinking the thermostat is stuck closed now. Possibly it was opening up because the engine never ran hot according to the guage anyway and then may have stuck after a few cycles? Who knows? Anyhoo, I will replace the thermostat this weekend hopefully. I have never replaced the thermostat in this engine so, heck, it could be the original one. I cannot find anything on YouTube about replacing a thermostat in the Gen 3 SHO 3.4 liter engine so I will look online or possibly V8SHO.com, or if anyone has instructions concerning this, then please pass them along. Thanks!!!

Sent from my SM-S916U using Tapatalk
 

Texas Marauder

Supporting Member
Supporting Member
Joined
Jul 20, 2007
Messages
908
Reaction score
818
Location
Lone Star State
1997 Taurus/Sable
3.4L SHO

Removal

  1. SVH~us~en~file=ani_caut.gif~gen~ref.gif
    WARNING: NEVER REMOVE THE PRESSURE RELIEF CAP UNDER ANY CONDITIONS WHILE THE ENGINE IS OPERATING. FAILURE TO FOLLOW THESE INSTRUCTIONS COULD RESULT IN DAMAGE TO THE COOLING SYSTEM OR ENGINE AND/OR PERSONAL INJURY. TO AVOID HAVING SCALDING HOT COOLANT OR STEAM BLOW OUT OF THE COOLING SYSTEM OR DEGAS BOTTLE, USE EXTREME CARE WHEN REMOVING THE PRESSURE RELIEF CAP FROM A HOT COOLING SYSTEM OR DEGAS BOTTLE. WAIT UNTIL THE ENGINE HAS COOLED, THEN WRAP A THICK CLOTH AROUND THE PRESSURE RELIEF CAP AND TURN IT SLOWLY UNTIL PRESSURE BEGINS TO RELEASE. STEP BACK WHILE THE PRESSURE IS RELEASED FROM THE COOLING SYSTEM. WHEN CERTAIN ALL PRESSURE HAS BEEN RELEASED, PRESS DOWN ON THE PRESSURE CAP (STILL WITH A CLOTH), TURN AND REMOVE PRESSURE RELIEF CAP.

    Drain the engine cooling system so that the engine coolant level is below the water thermostat.
  2. Remove battery (10653). Refer to Section 14-01 .
  3. Remove power distribution box.
  4. Remove battery tray (10732). Refer to Section 14-01 .
  5. Disconnect upper radiator hose and position out of the way.
  6. Disconnect the lower radiator hose from the water inlet connection (8K528).
  7. Remove the two retaining bolts. Remove the water inlet connection.
  8. Remove the O-ring seal and water thermostat from the water pump (8501). Inspect O-ring for damage and replace if necessary.
  9. Thermostat
    1770695206588


    ItemPart NumberDescription
    18K528Water Inlet Connection
    2O-Ring (Part of 8575)
    38575Water Thermostat
    48501Water Pump
    5Stud Bolt
    6Bolt
    ATighten to 15-22 Nm (11-16 Lb-Ft)
    BTighten to 8-12 Nm (71-106 Lb-In)
Installation

  1. Install the water thermostat, O-rings and water inlet connection as illustrated.
  2. Install and alternately tighten the retaining bolts. Tighten bolts to 8-12 Nm (71-106 lb-in).
  3. Connect the lower radiator hose to the water inlet connection.
  4. Install upper radiator hose. Position spring clamp securely.
  5. Install battery tray. Refer to Section 14-01 .
  6. Install power distribution box.
  7. Install battery. Refer to Section 14-01 .
  8. Fill the cooling system with Premium Cooling System Fluid E2FZ-19549-AA or -B in Oregon, F5FZ-19549-CC, in Canada, CXC-8-B, Recycled Coolant, or equivalent that meets Ford specification ESE-M97B44-A in a 50/50 mixture with water as described under Cooling System, Draining, Filling and Bleeding procedure.
  9. Start the engine and check all hoses and connections for leaks. Allow the engine to warm up so that the water thermostat opens.
  10. Stop the engine. Top off degas bottle as required to maintain minimum cold fill level.
1770695772547
 

Funmart6

my name is mud
Joined
Apr 2, 2003
Messages
1,286
Reaction score
116
Location
Auburn, Alabama
Thank you. The first picture isn't viewable for some reason. I do see that the thermostat looks to be housed right where the heater hose is attached so, yep, very familiar with that area.

Sent from my SM-S916U using Tapatalk
 

Funmart6

my name is mud
Joined
Apr 2, 2003
Messages
1,286
Reaction score
116
Location
Auburn, Alabama
The GIF? It's nothing, just weird formatting that won't let me delete it.
Okay, I didn't know what it was because it looked like this. Thanks for the information, looks like I've got something to keep me busy this weekend!!! 35d8767382da90d42a3aca85dc109829

Sent from my SM-S916U using Tapatalk
 

Funmart6

my name is mud
Joined
Apr 2, 2003
Messages
1,286
Reaction score
116
Location
Auburn, Alabama
I didn't realize until just now that I have a picture of where the thermostat is located. This picture shows the black metal bracket that the battery tray bolts to. It shouldn't be too difficult to replace the thermostat after all. Good times!!! Fd0e97c98d36363f157932d74656202a

Sent from my SM-S916U using Tapatalk
 
Last edited:

Funmart6

my name is mud
Joined
Apr 2, 2003
Messages
1,286
Reaction score
116
Location
Auburn, Alabama
I removed the old thermostat today. This is a 180 degree thermostat. I'm not sure what the "96 10" numbers are and there is not a manufacturer name on it anywhere.
I have not installed the new one yet. I could not find a 192 degree thermostat so I went with a 180 degree one. I have owned this car since 2003 and have never replaced the thermostat so, it has had a 180 in it the whole time I have had the car. If you look closely you can see that this thermostat is actually open, but not fully opened, at least it looks that way to me. 9d3217271f0f138a7e34fed0caa37cc86a4d564f05e95049961545757f42cc5f

Sent from my SM-S916U using Tapatalk
 

Funmart6

my name is mud
Joined
Apr 2, 2003
Messages
1,286
Reaction score
116
Location
Auburn, Alabama
I have to do things in small steps, I work a 2nd shift job and only have a couple of hours in the mornings to do anything at all. Today I installed the new thermostat and while I had all the hoses off, I flushed out the cooling system with the garden hose, (hose pipe if you are from the south 
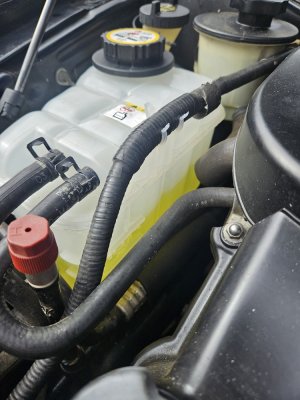
), and ran the water through the upper, lower, and reservoir hoses until I saw clean clear water coming out. I did that first then installed the thermostat and torqued the thermostat housing bolts to 80 inch pounds and reattached the upper and lower hoses. Tomorrow I will reinstall the reservoir and flush the system again with the engine running, then drain and refill with coolant. Whew, baby steps.

Sent from my SM-S916U using Tapatalk
 

Funmart6

my name is mud
Joined
Apr 2, 2003
Messages
1,286
Reaction score
116
Location
Auburn, Alabama
Making progress. The car now has fresh coolant and fresh oil. I drove the car the other day and rechecked fluid levels and all is good with no leaks. I discovered the driver's side axle has been slinging grease so I will be replacing that this weekend. Please check out my post about the axle replacement as I have a question (with pics) about the routing of a hose. Thanks y'all.

Sent from my SM-S916U using Tapatalk
 

Funmart6

my name is mud
Joined
Apr 2, 2003
Messages
1,286
Reaction score
116
Location
Auburn, Alabama
It is nice to be able to see how much coolant is in the tank now.

Sent from my SM-S916U using Tapatalk
66e9ecc78ed22cefd56f1b493b41c9e6

Posted the pic twice by mistake and can't seem to delete it. Oh well.
 

Attachments

  • 4afc8031dedd2b7b5a322c5b757de27c.jpg
    4afc8031dedd2b7b5a322c5b757de27c.jpg
    522.4 KB · Views: 2
Last edited:

Funmart6

my name is mud
Joined
Apr 2, 2003
Messages
1,286
Reaction score
116
Location
Auburn, Alabama
Question for y'all, what coolant do y'all use? I used some made for all makes and models but if there is something better recommended then I can always change it.

Sent from my SM-S916U using Tapatalk
 

E1

Crash Tested
Joined
Jan 24, 2003
Messages
784
Reaction score
516
Location
Chicago area
Green is fine in my book. Never had a corrosion issue in the many SHO's I've owned over the years.

Also, most of the folks here have no idea about our discussions over on TCCA about why you changed the coolant tank.
 

Funmart6

my name is mud
Joined
Apr 2, 2003
Messages
1,286
Reaction score
116
Location
Auburn, Alabama
Okay. To clarify, the original "black top" reservoirs were apparently notorious for developing cracks on the bottom and leaking. You wouldn't notice it much until you did and the low coolant light would come on. When I took mine out and cleaned it, I noticed a lot of cracks and had no idea and yes, it definitely was leaking, hence, the replacement.

Sent from my SM-S916U using Tapatalk
 
  • Like
Reactions: E1

Texas Marauder

Supporting Member
Supporting Member
Joined
Jul 20, 2007
Messages
908
Reaction score
818
Location
Lone Star State
The tanks crack from heat, pressure and age. I went to clean a tank on a 2019 Charger and looking inside saw cracks everywhere. You couldn't see the cracks from the outside and wasn't leaking.
 

Funmart6

my name is mud
Joined
Apr 2, 2003
Messages
1,286
Reaction score
116
Location
Auburn, Alabama
Yeah, and the fact that the tank I had was the original one so, basically a plastic part like that is definitely going to have issues being 29 years old.

Sent from my SM-S916U using Tapatalk
 

Funmart6

my name is mud
Joined
Apr 2, 2003
Messages
1,286
Reaction score
116
Location
Auburn, Alabama
Okay the car was fine for about a day and then it started losing some coolant from a slow drip. I put a pressure tester on it today and saw drips from under the water pump. I used a mirror to try and see exactly where the drip was coming from, figured it could be from a weep hole. So, I started removing the entire housing assembly. There are only 4 bolts to remove but dang, I haven't gotten it completely off the engine yet because of the tensioner pulley. I figured if I could remove that pulley, it may give me enough clearance to manipulate the thing out of the engine bay, it's like a puzzle. Has anyone ever replaced a water pump on this engine and if so please share some tips. Gonna head over to V8SHO.com and see if I can find some instructions also.

Sent from my SM-S916U using Tapatalk
 

Funmart6

my name is mud
Joined
Apr 2, 2003
Messages
1,286
Reaction score
116
Location
Auburn, Alabama
Wow, so I was actually removing everything correctly without any instructions but I just found this on V8SHO.com.
I just have to figure out the combination to removing the short rubber hose of the inlet pipe in hopes that will allow enough clearance to remove the whole housing. 54789e8390d60b59afc3ed9e0f680c0166740e0e336aa0fab612f94ecf37c9c8

Sent from my SM-S916U using Tapatalk
 

Forum statistics

Threads
107,088
Messages
1,181,315
Members
16,153
Latest member
lapochkarr

Members online

Back
Top