
iw2led
New Member
I've been working on this for about a month and the delay in getting the mirror delivered was quite frankly.
First of all, my car is a 2013 Ford Taurus SHO non PP I have all the features except the lane departure system.
Let's start the explanation
---
Requirements:
Rearview mirror with Lane Departure Warning (LDW) functionality (part number EU5Z-17700 forget the last word it was G or J but make sure it is with Lane Keeping ).
Laptop with FORScan software installed. ( Find out how to install it with the license )
USB ELM327 OBDII adapter to connect the car to the laptop.
(Optional) LDW ON/OFF button – not required, since the system can be controlled from the left instrument cluster screen.
---
Mirror Installation Steps:
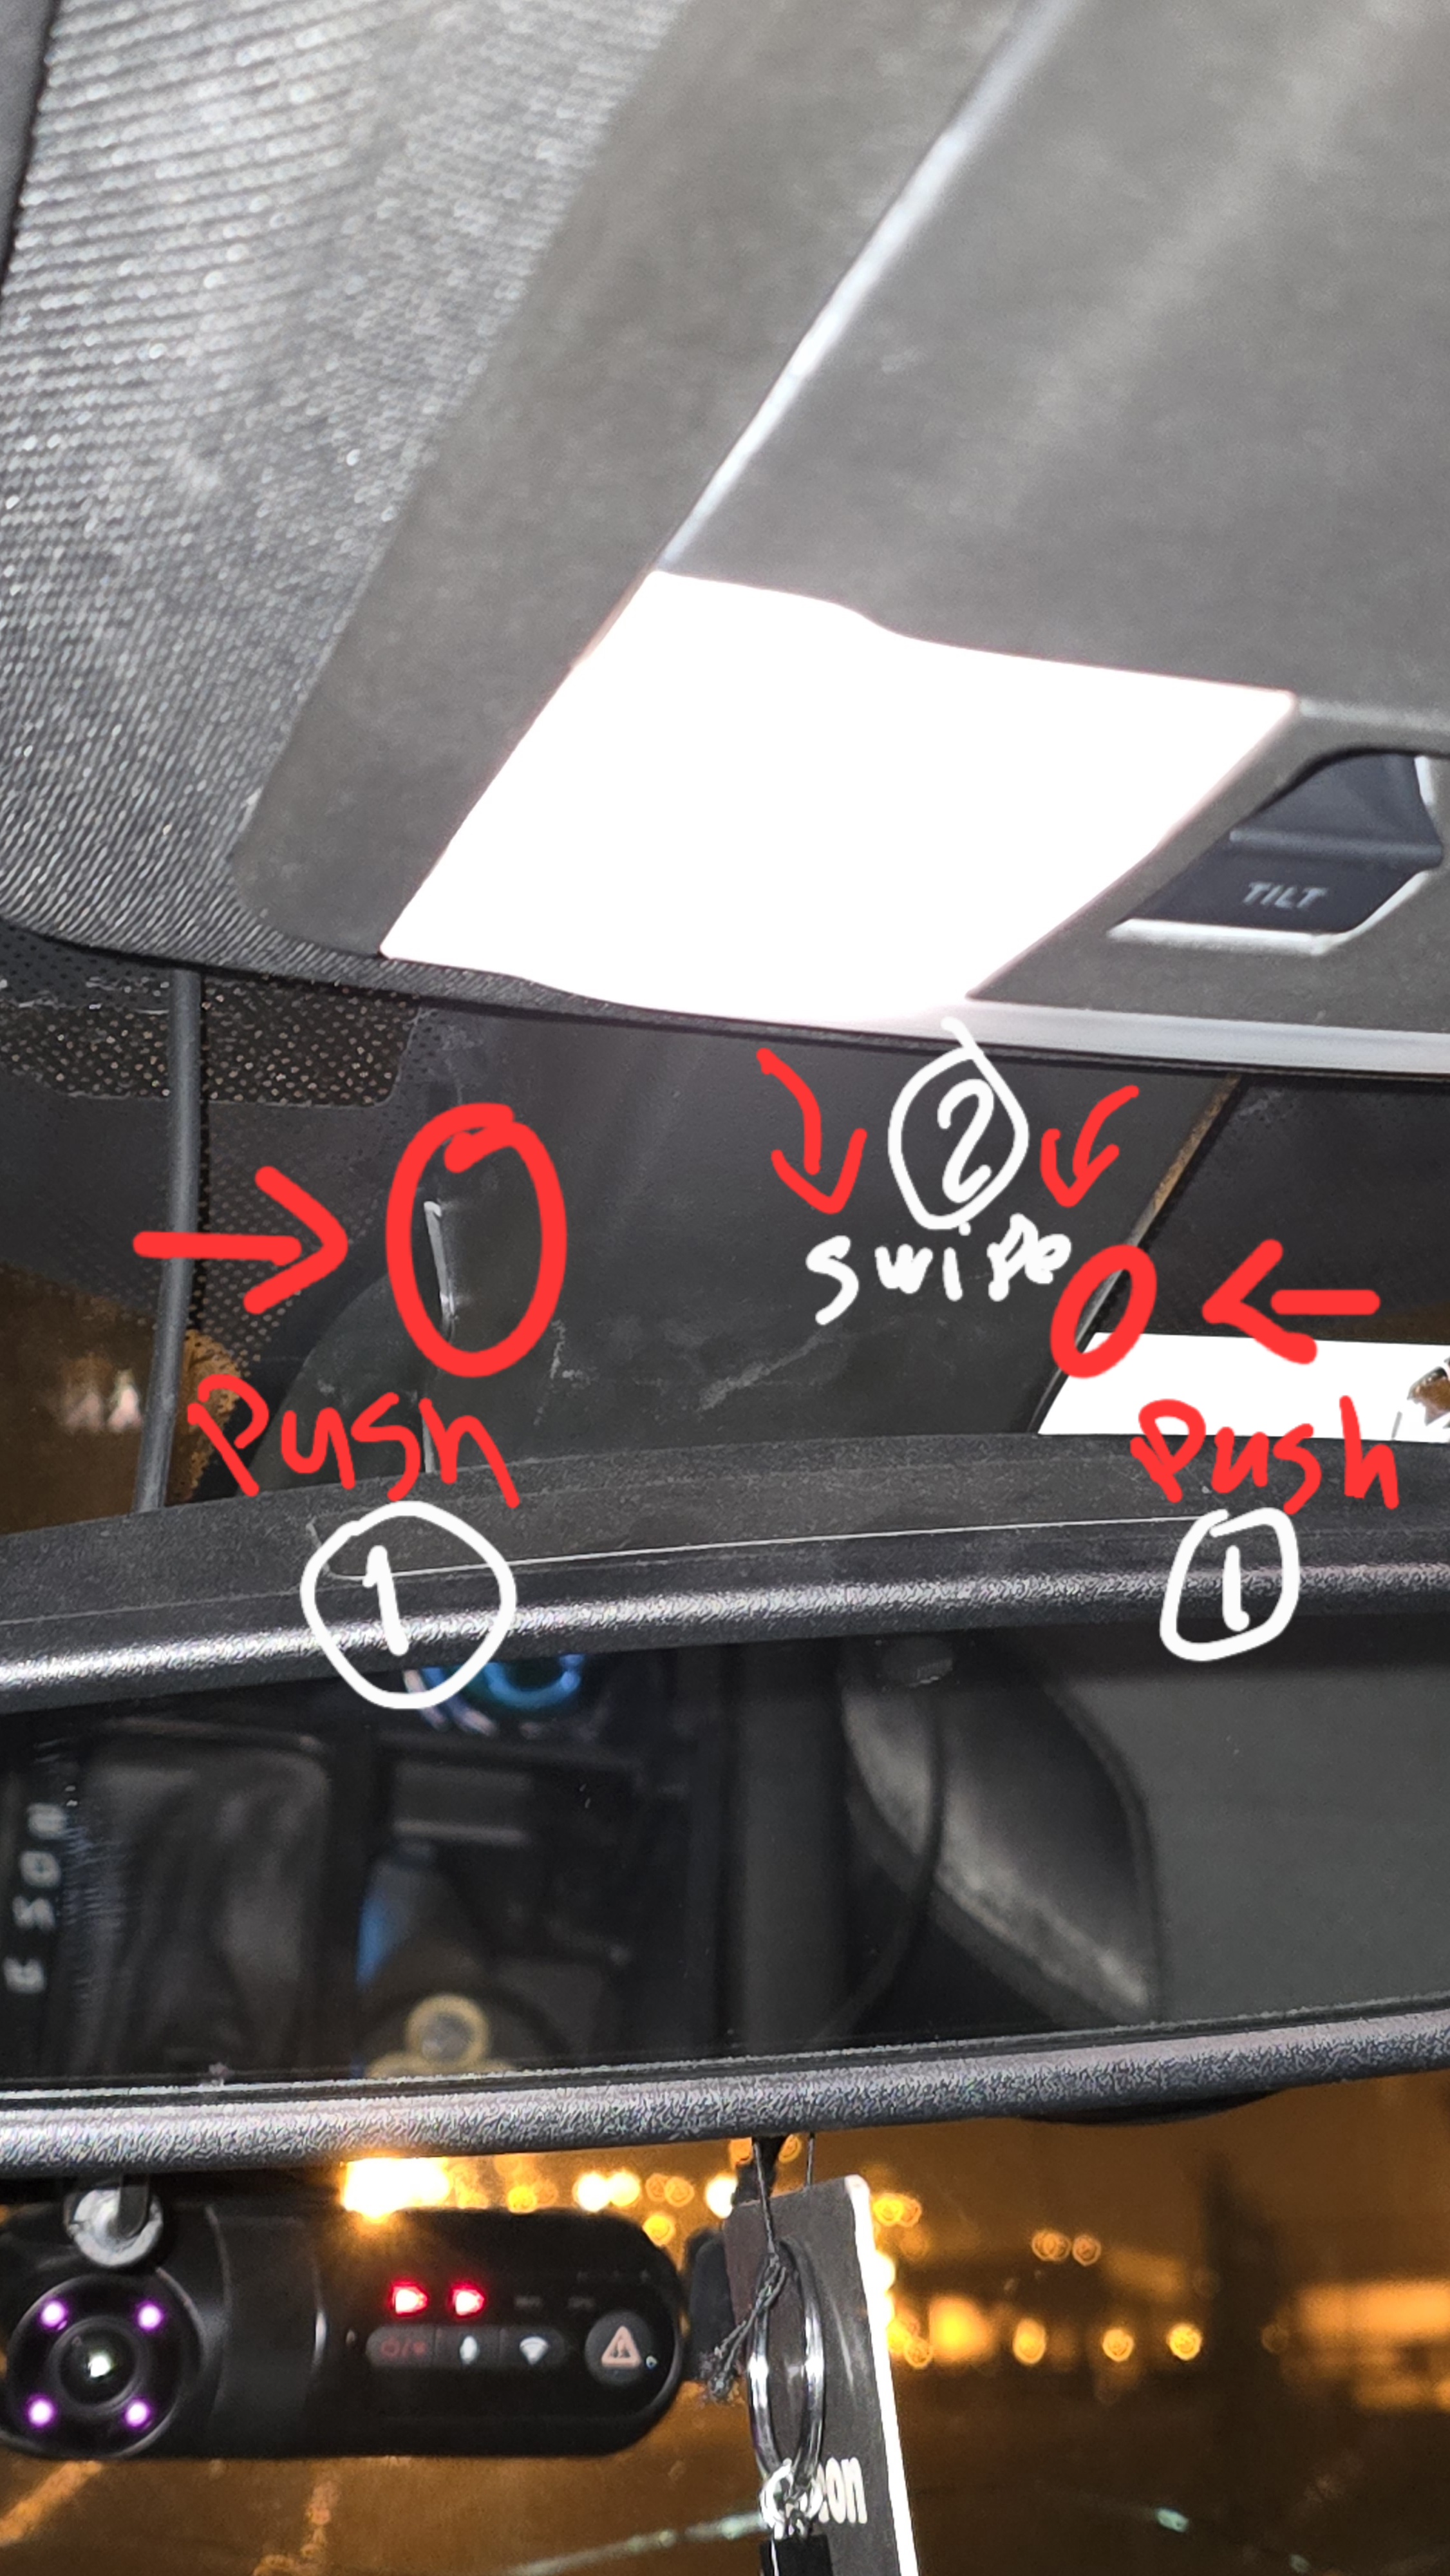
1. Remove the Upper Plastic Cover:
Press inward on both sides of the upper plastic cover.
Pull the cover downward (top to bottom) as shown in the image.

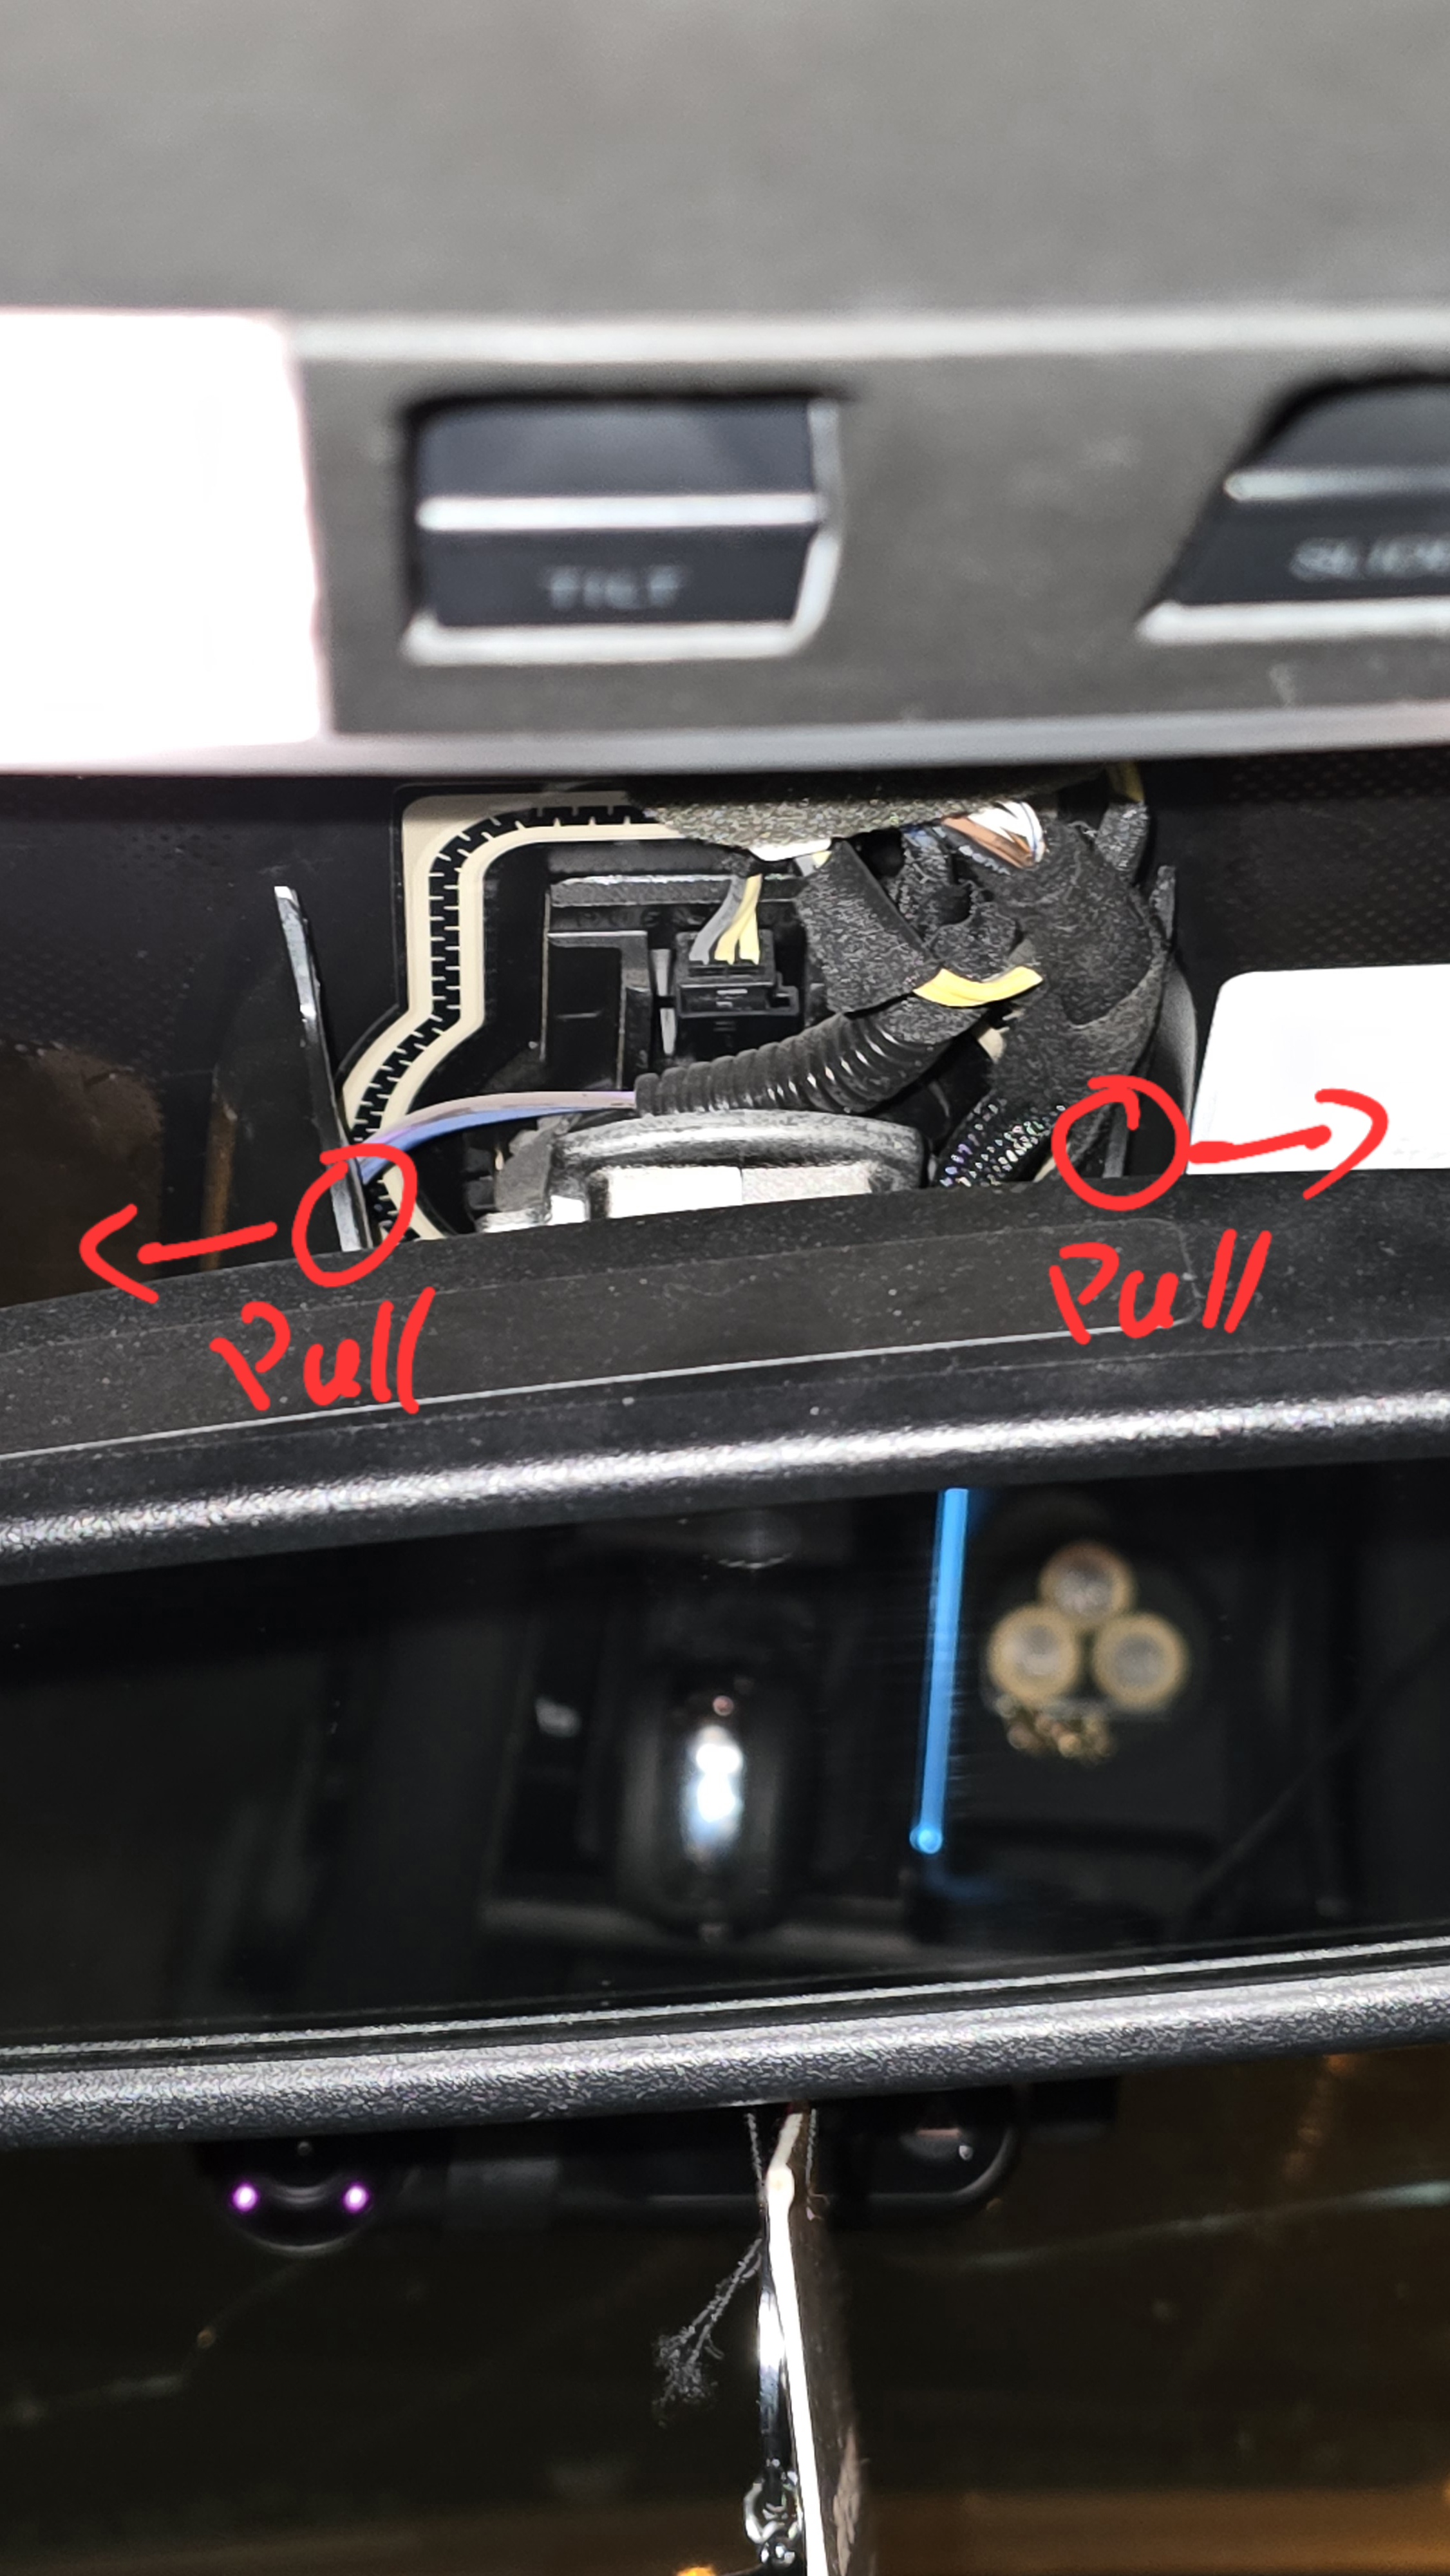
2. Remove the Second Plastic Cover:
Pull the cover outward from both sides.

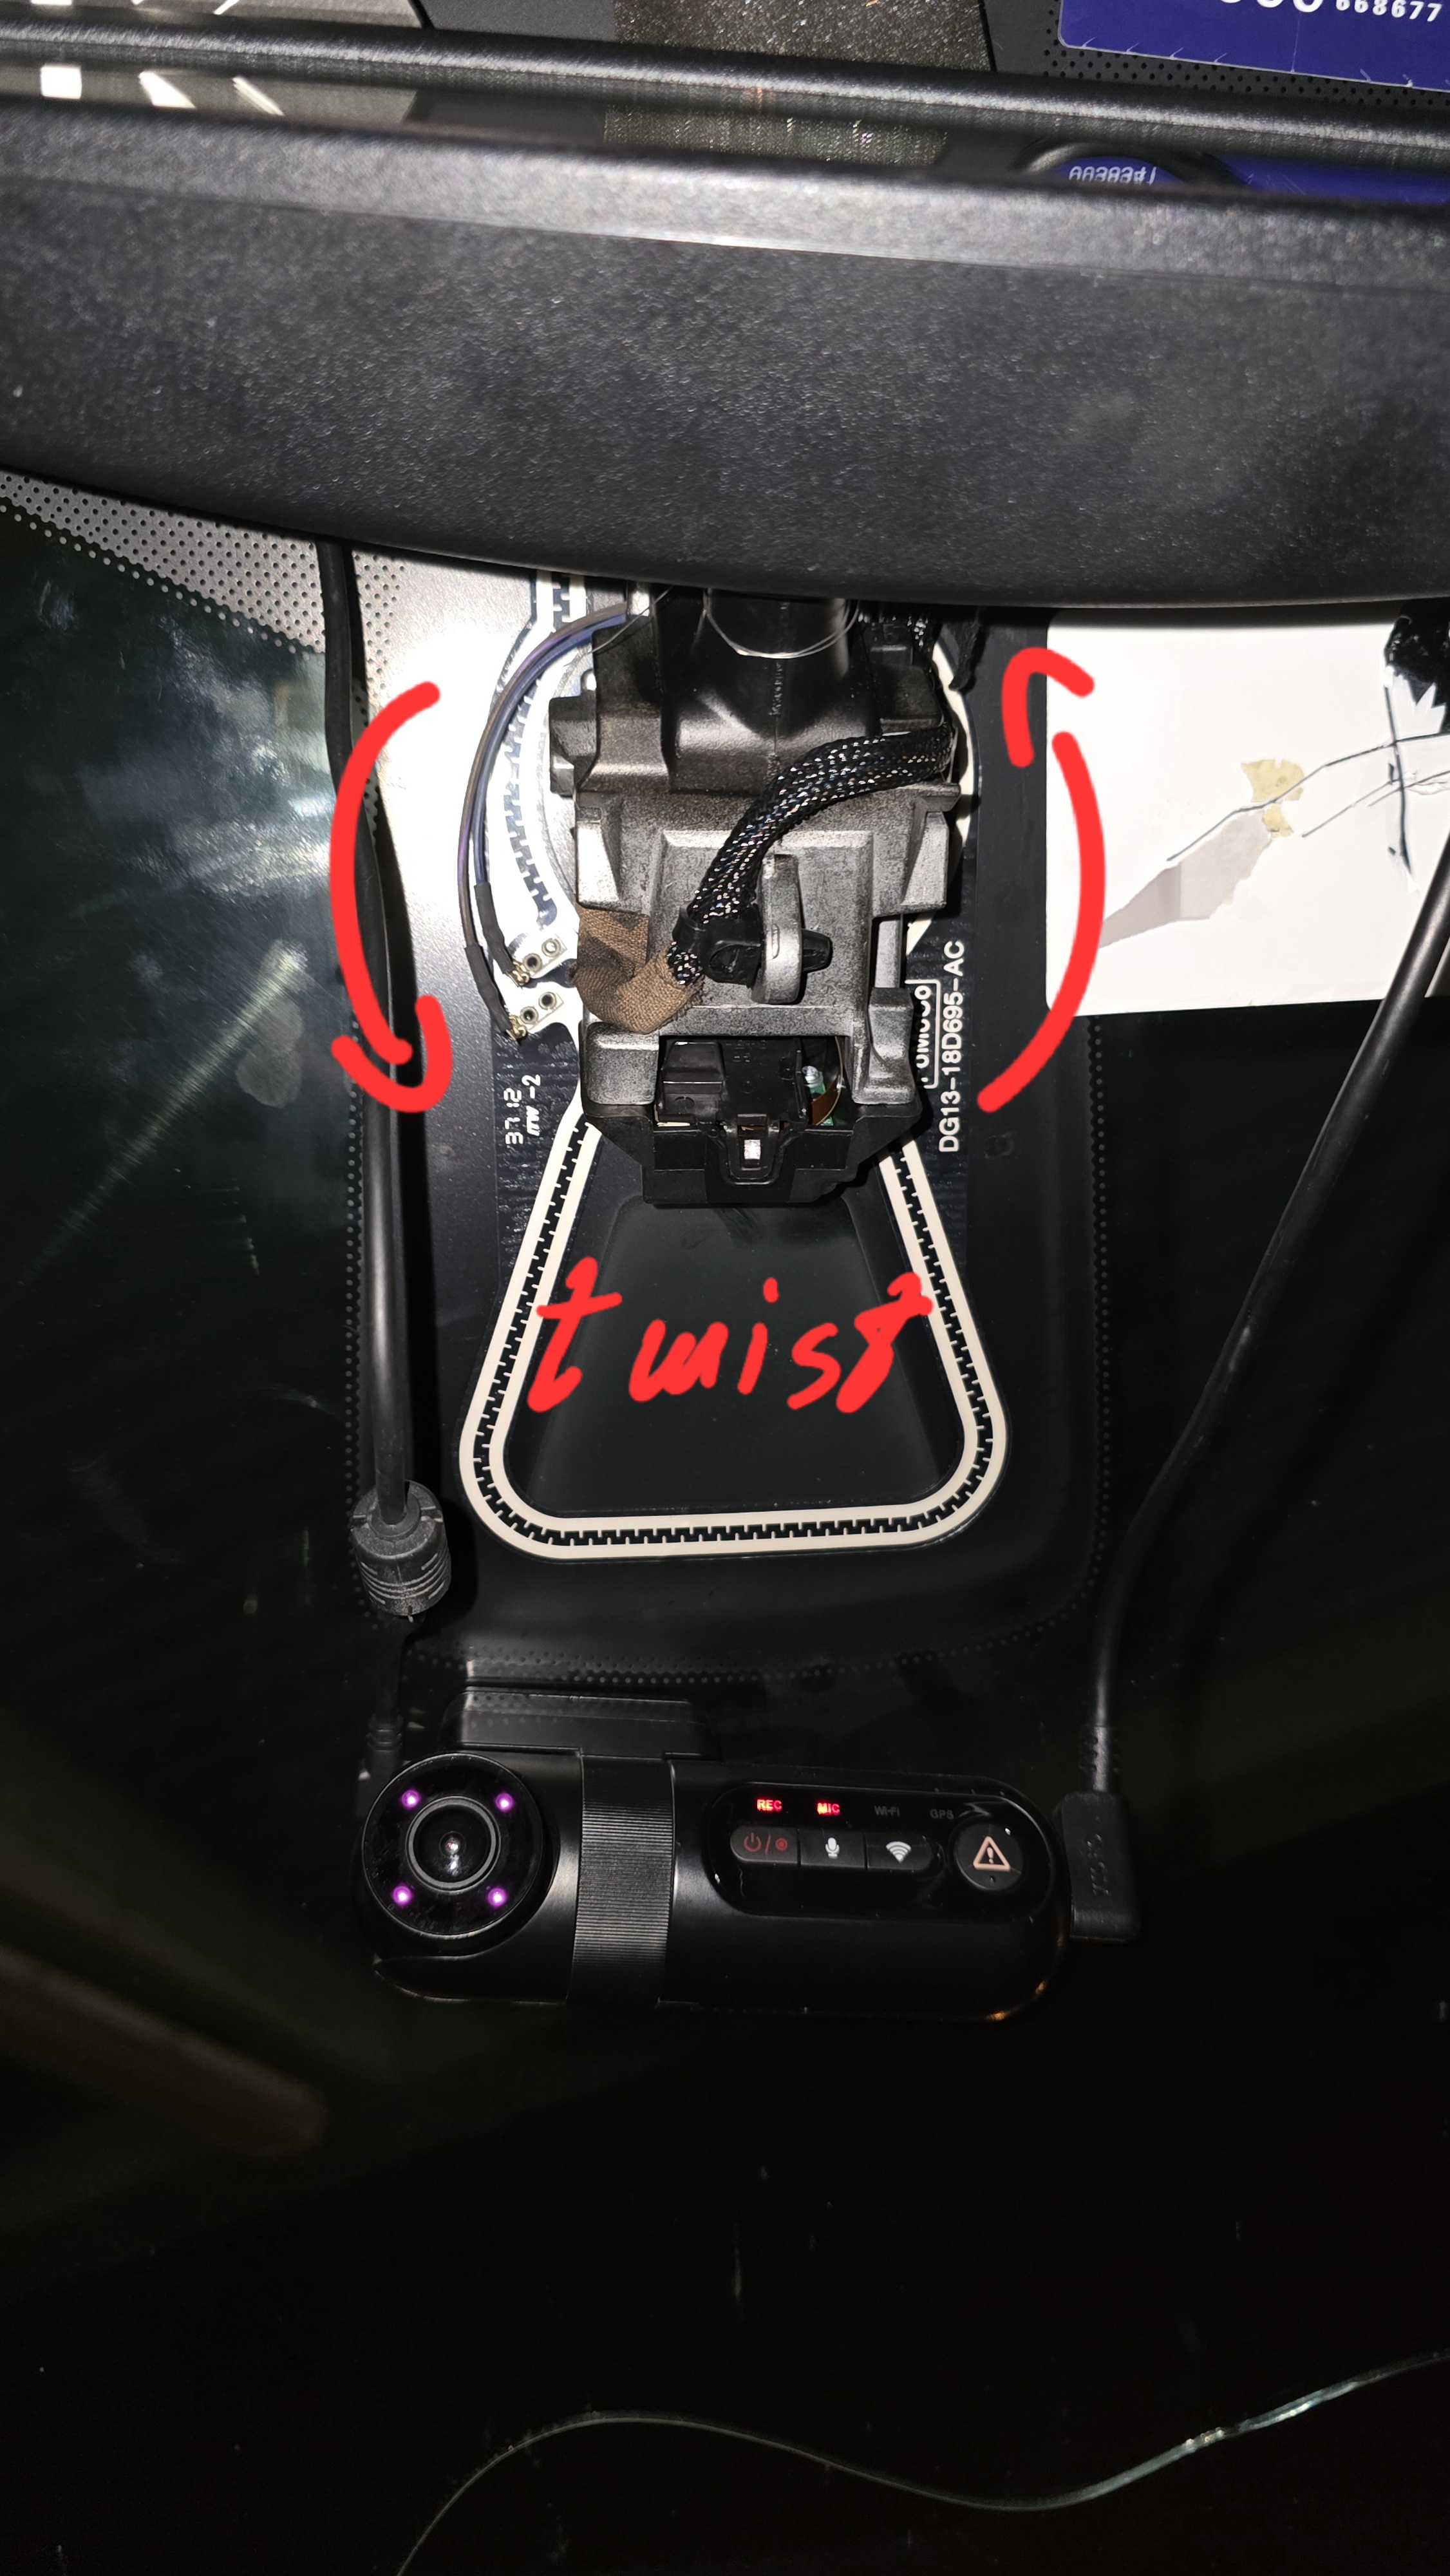
3. Disconnect the Mirror Plug:
Once the mirror is visible, disconnect the electrical plug from the mirror.
4. Remove the Old Mirror:
Firmly twist the mirror counterclockwise to release it from the mount.

5. Install the New Mirror:
Install the new mirror by reversing the removal steps.
Connect the electrical plug.
> Note: The LDW ON/OFF button is not required, as the system can be enabled or disabled through the left-side screen. Therefore, installation or explanation of the button is not included in this guide.
---
Programming with FORScan:
After completing the physical installation, everything is ready for programming
1. Connect the Vehicle:
Launch the FORScan program on your laptop.
Connect the USB ELM327 OBDII adapter to the car and your laptop.
Click the connect icon at the bottom of the screen.
Wait for the modules to be read. Once complete, you’ll see “Ready” and a green dot.
2. Enter Configuration and Programming:
Click on the "Configuration and Programming" tab (chip icon).
3. You will need to program three modules:
IPC (Instrument Panel Cluster)
PSCM (Power Steering Control Module)
IPMA (Image Processing Module A)
---
General Programming Procedure:
For each module:
Click on the module name.
Press the Play icon at the bottom to read it.
Once the values appear, edit the required lines.
After editing, press Write next to the edited line.
Once finished, press the Stop icon and move to the next module.
---
1. IPC Module:
Go to line: 720-01-03
Locate the value marked with an asterisk:
xxxx-x*xx.xx
If the marked value is 0, change it to 4.
Click Write and exit the IPC module.
---
2. PSCM Module:
Go to line: 730-02-01
Locate the value:
xxxx-x*xx.xx
If the marked value is 0, change it to 1.
Click Write and exit the PSCM module.
---
3. IPMA Module:
Update the following lines exactly as shown below (compare and change only if different):
706-01-01: 1F89 0A82 43
706-02-01: FFFF FFFF FF0B
706-02-02: FFCO CC9C
706-03-01: 4490 4000 25
706-04-01: 9F40 0080 71
After editing each line, press Write for that specific line.
---
Final Notes:
After programming, the Lane Departure Warning system is now enabled.
However, it might not appear on the instrument cluster screen yet, because it requires calibration.
---
Lane Departure Camera Calibration using FORScan
---
Requirements:
The new mirror with the camera must be properly installed and secured.
Drive on a straight road with clear lane markings.
Vehicle speed must be above 60 km/h.
No DTC (error codes) should be present in the IPMA module.
---
Calibration Steps:
1. In FORScan, go to the Service Functions tab (wrench icon on the left).
2. Wait for the list to load, then look for:
"IPMA Camera Calibration"
or "IPMA Static Calibration" / "Windshield Camera Calibration"
3. Select the calibration function and click the Play icon.
4. Follow the on-screen instructions – usually, it will ask you to:
Drive above 60 km/h on a straight road
Make sure the road has clear, visible lane markings
5. While driving, the IPMA module will start calibrating automatically.
---
Important Notes:
Ensure the windshield is clean, and the camera has a clear view.
First of all, my car is a 2013 Ford Taurus SHO non PP I have all the features except the lane departure system.
Let's start the explanation
---
Requirements:
Rearview mirror with Lane Departure Warning (LDW) functionality (part number EU5Z-17700 forget the last word it was G or J but make sure it is with Lane Keeping ).
Laptop with FORScan software installed. ( Find out how to install it with the license )
USB ELM327 OBDII adapter to connect the car to the laptop.
(Optional) LDW ON/OFF button – not required, since the system can be controlled from the left instrument cluster screen.
---
Mirror Installation Steps:
1. Remove the Upper Plastic Cover:
Press inward on both sides of the upper plastic cover.
Pull the cover downward (top to bottom) as shown in the image.
2. Remove the Second Plastic Cover:
Pull the cover outward from both sides.
3. Disconnect the Mirror Plug:
Once the mirror is visible, disconnect the electrical plug from the mirror.
4. Remove the Old Mirror:
Firmly twist the mirror counterclockwise to release it from the mount.
5. Install the New Mirror:
Install the new mirror by reversing the removal steps.
Connect the electrical plug.
> Note: The LDW ON/OFF button is not required, as the system can be enabled or disabled through the left-side screen. Therefore, installation or explanation of the button is not included in this guide.
---
Programming with FORScan:
After completing the physical installation, everything is ready for programming
1. Connect the Vehicle:
Launch the FORScan program on your laptop.
Connect the USB ELM327 OBDII adapter to the car and your laptop.
Click the connect icon at the bottom of the screen.
Wait for the modules to be read. Once complete, you’ll see “Ready” and a green dot.
2. Enter Configuration and Programming:
Click on the "Configuration and Programming" tab (chip icon).
3. You will need to program three modules:
IPC (Instrument Panel Cluster)
PSCM (Power Steering Control Module)
IPMA (Image Processing Module A)
---
General Programming Procedure:
For each module:
Click on the module name.
Press the Play icon at the bottom to read it.
Once the values appear, edit the required lines.
After editing, press Write next to the edited line.
Once finished, press the Stop icon and move to the next module.
---
1. IPC Module:
Go to line: 720-01-03
Locate the value marked with an asterisk:
xxxx-x*xx.xx
If the marked value is 0, change it to 4.
Click Write and exit the IPC module.
---
2. PSCM Module:
Go to line: 730-02-01
Locate the value:
xxxx-x*xx.xx
If the marked value is 0, change it to 1.
Click Write and exit the PSCM module.
---
3. IPMA Module:
Update the following lines exactly as shown below (compare and change only if different):
706-01-01: 1F89 0A82 43
706-02-01: FFFF FFFF FF0B
706-02-02: FFCO CC9C
706-03-01: 4490 4000 25
706-04-01: 9F40 0080 71
After editing each line, press Write for that specific line.
---
Final Notes:
After programming, the Lane Departure Warning system is now enabled.
However, it might not appear on the instrument cluster screen yet, because it requires calibration.
---
Lane Departure Camera Calibration using FORScan
---
Requirements:
The new mirror with the camera must be properly installed and secured.
Drive on a straight road with clear lane markings.
Vehicle speed must be above 60 km/h.
No DTC (error codes) should be present in the IPMA module.
---
Calibration Steps:
1. In FORScan, go to the Service Functions tab (wrench icon on the left).
2. Wait for the list to load, then look for:
"IPMA Camera Calibration"
or "IPMA Static Calibration" / "Windshield Camera Calibration"
3. Select the calibration function and click the Play icon.
4. Follow the on-screen instructions – usually, it will ask you to:
Drive above 60 km/h on a straight road
Make sure the road has clear, visible lane markings
5. While driving, the IPMA module will start calibrating automatically.
---
Important Notes:
Ensure the windshield is clean, and the camera has a clear view.
Last edited:


