Wet Floorboard with Stripped Interior Pictures

Disclaimer: Links on this page pointing to Amazon, eBay and other sites may include affiliate code. If you click them and make a purchase, we may earn a small commission.

LilCop2002

SHO Member
Joined
May 25, 2019
Messages
162
Reaction score
177
Location
In the South.
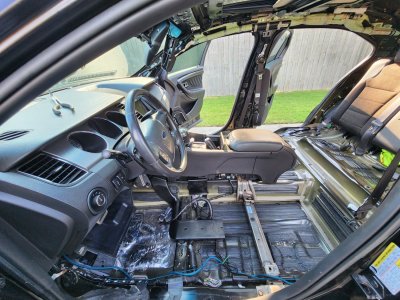
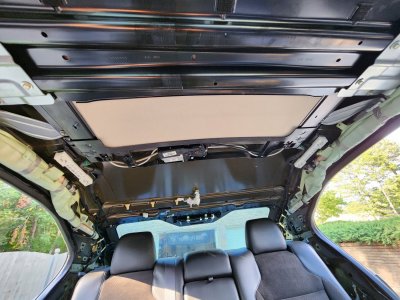
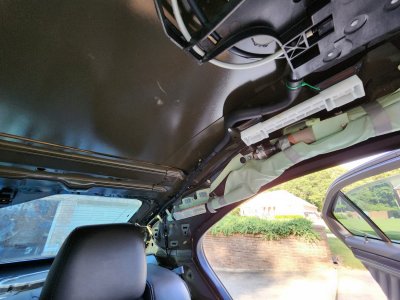
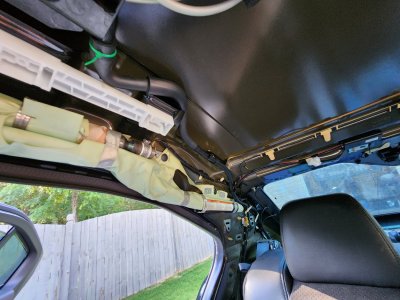
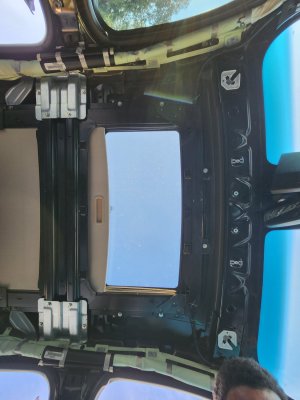
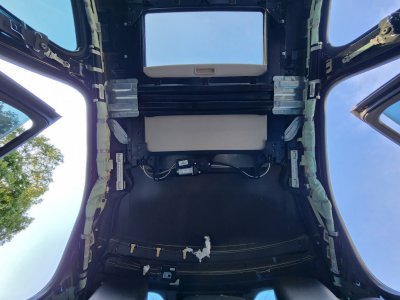
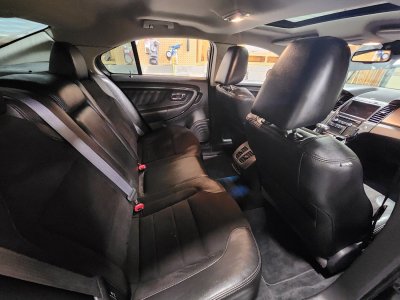
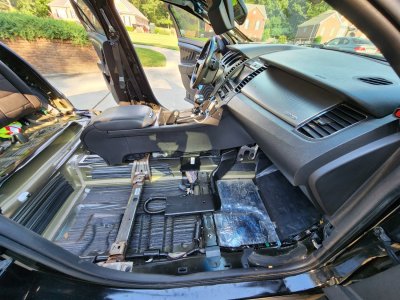
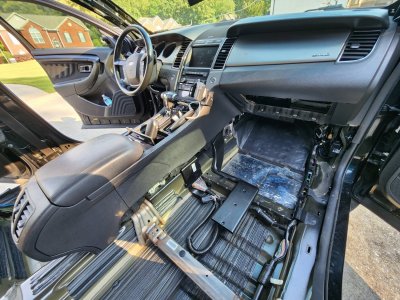
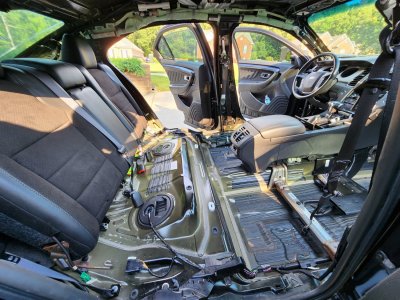
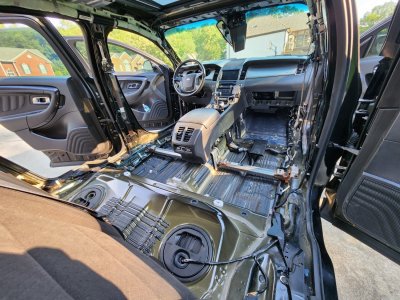
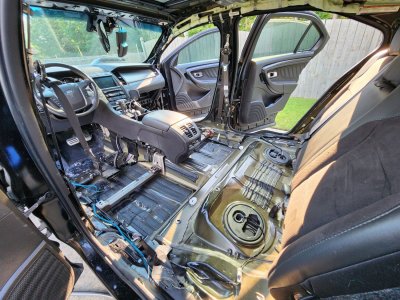
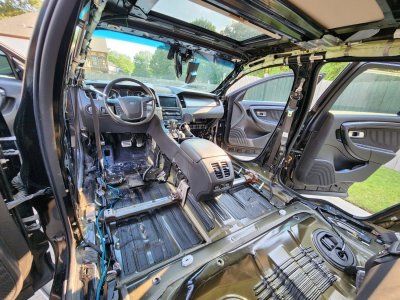
Having had an elusive pool of water on the passenger floorboards (front and rear depending on how car is parked) of my 2010 SHO non-PP over the past years, I finally took decisive action and stripped the interior.

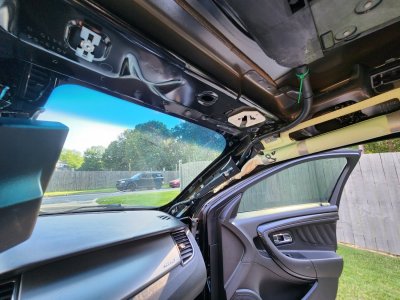
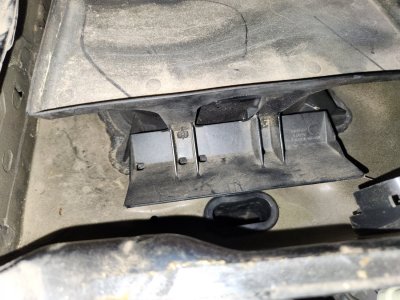
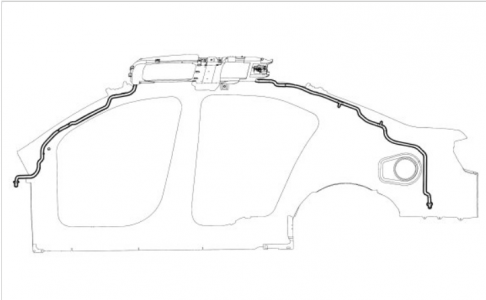
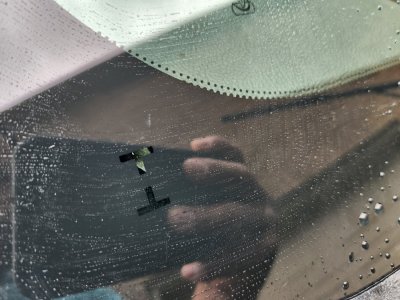
While the interior is out, I ran a hard stream of water to simulate the thunderstorms we had this weekend and confirmed that the sunroof's front passenger drain was my problem. While I already knew it (the drain line was clearly disconnected), it helped validate my suspicions and direct a fix.

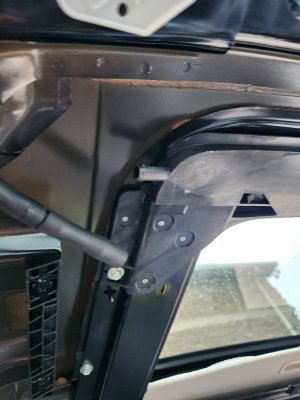
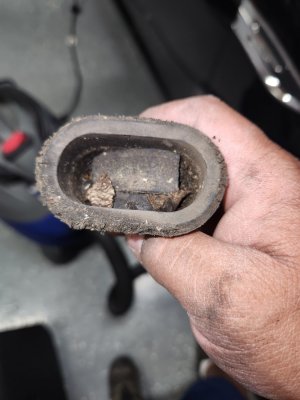
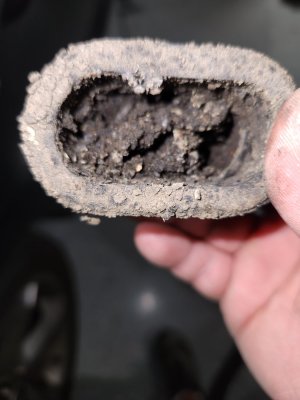
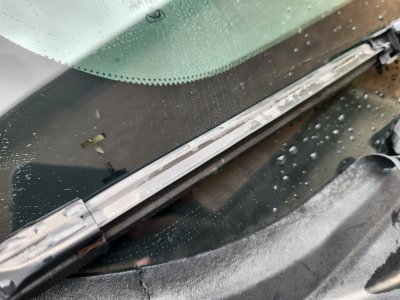
I then used .095 trimmer line to verify the drain lines were clear of obstructions, used an air compressor to push under 10psi of air through the lines while listening for (and receiving) the whoosh of air sound at 4 corners, and did the same process for the sunroof drain holes.

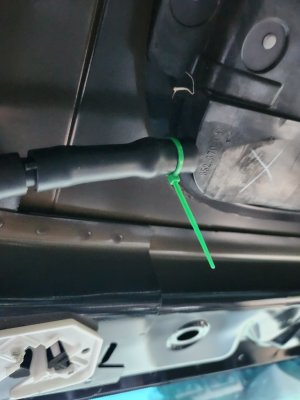
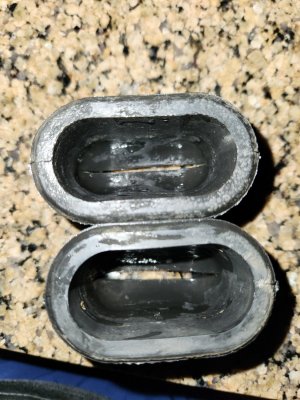
When reconnecting the drain lines to the sunroof's drain holes, I used small zip ties to ensure this problem is (permanently?) fixed. Subsequent water testing showed the sunroof is not leaking and a slower stream showed the water was coming out in the 4 corners where the drain lines would terminate.

It turns out that my journey isn't done as now my HVAC fan blower is leaking, too. Already looking for a less expensive cowl as Tasca Parts has it for nearly $250 (I'm still looking) and I need to check the cowl drain plugs.

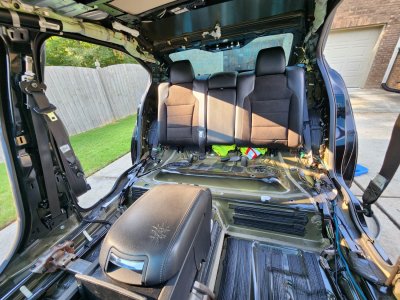
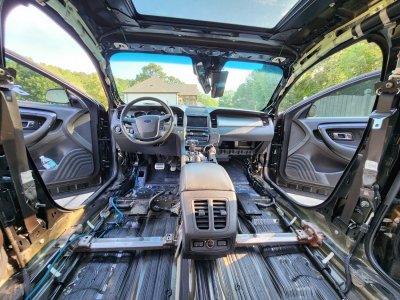
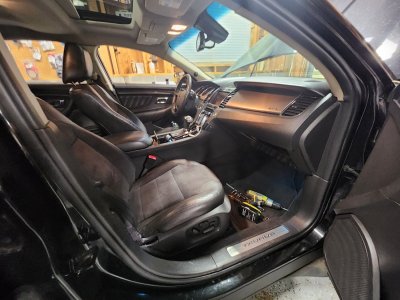
Since I've got it all apart and taking my time cleaning carpets, seats, headliner, etc., I took pictures of everything I can recall people asking about. I plan on taking a slow speed over this weekend to put it all back in. Please overlook the mess as she's been a solid road warrior for 13 years and is pushing 200K miles.

If you need additional pictures, please let me know.

Pics 1-6.

keywords: sunroof drain plugs cowl plugs wet floorboard water leaks windshield cowl drain lines
 

Attachments

  • 20240530_172847.jpg
    20240530_172847.jpg
    423.7 KB · Views: 34
  • 20240530_172857.jpg
    20240530_172857.jpg
    460.2 KB · Views: 28
  • 20240530_172907.jpg
    20240530_172907.jpg
    425.3 KB · Views: 24
  • 20240530_172941.jpg
    20240530_172941.jpg
    447.4 KB · Views: 26
  • 20240530_172954.jpg
    20240530_172954.jpg
    474.3 KB · Views: 30
  • 20240530_172959.jpg
    20240530_172959.jpg
    486.3 KB · Views: 27
Last edited:

LilCop2002

SHO Member
Joined
May 25, 2019
Messages
162
Reaction score
177
Location
In the South.
Pics 7-12
 

Attachments

  • 20240530_173017.jpg
    20240530_173017.jpg
    426.1 KB · Views: 22
  • 20240530_173023.jpg
    20240530_173023.jpg
    443.6 KB · Views: 20
  • 20240530_173035.jpg
    20240530_173035.jpg
    458.5 KB · Views: 20
  • 20240530_173057.jpg
    20240530_173057.jpg
    252.8 KB · Views: 22
  • 20240530_173107.jpg
    20240530_173107.jpg
    329.8 KB · Views: 25
  • 20240530_173113.jpg
    20240530_173113.jpg
    298.2 KB · Views: 26

LilCop2002

SHO Member
Joined
May 25, 2019
Messages
162
Reaction score
177
Location
In the South.
Pics 13-17.
 

Attachments

  • 20240530_173144.jpg
    20240530_173144.jpg
    347 KB · Views: 23
  • 20240530_173153.jpg
    20240530_173153.jpg
    306.7 KB · Views: 22
  • 20240530_173200.jpg
    20240530_173200.jpg
    307.4 KB · Views: 21
  • 20240530_173433.jpg
    20240530_173433.jpg
    199 KB · Views: 20
  • 20240530_173459.jpg
    20240530_173459.jpg
    216.6 KB · Views: 22
Last edited:

LilCop2002

SHO Member
Joined
May 25, 2019
Messages
162
Reaction score
177
Location
In the South.
Pics 18-20.

Clearly the issues stem from this spot of the sunroof...
 

Attachments

  • 20240528_191815.jpg
    20240528_191815.jpg
    212.2 KB · Views: 22
  • Screenshot_20240530_180914_Video Player.jpg
    Screenshot_20240530_180914_Video Player.jpg
    182.9 KB · Views: 25
  • 20240528_193711.jpg
    20240528_193711.jpg
    181.4 KB · Views: 29
Last edited:

kryptto

The Best Thing About Cars... ones in my mirror.
Supporting Member
Joined
Mar 24, 2023
Messages
3,201
Reaction score
2,074
Location
South East, Florida
Sorry I don't have any experience here, BUT thank you for sharing all those pictures helps us others who haven't ripped out the interior.
 

SHOrod

Torrie Tuned
Joined
Jan 1, 2006
Messages
1,194
Reaction score
533
Location
Cedar Rapids, IA
Thank you for sharing those photos!

When putting it back together I recommend wrapping the wiring for the sunroof/overhead console with some felt tape or carpet/similar to save yourself from trying to track down a rattle at a later date. That harness teased me with a rattle for quite a while before I finally found it. At first I thought it was the rear sunshade, until rear passenger said it was definitely coming from the front seat area. Then it seemed to be from the grab handle above the passenger door. But then a front seat passenger confirmed that wasn't it, and I found that pulling down on the headliner just ahead of the sunroof would change the rattle. A rag wrapped around the wiring bundle confirmed the source.

-Rod
 

Tbird6

SHO Member
Joined
Dec 24, 2015
Messages
168
Reaction score
119
I have never seen a SHO interior stripped so far down!
Excellent find on the moon roof drain too as that happened to my old 2003 Lincoln LS V8 Sport.

Great set of pictures!
.
.
.
 

LilCop2002

SHO Member
Joined
May 25, 2019
Messages
162
Reaction score
177
Location
In the South.
Pics 21-27.

Man... you'd think I had never cleaned this car and parked under trees.

Goes to show that even with occasional care these drains may just get nasty and cause huge issues.

I'm not sure why I cleaned, trimmed, and replaced them versus leaving them out but the drains are back in place and no issues of water leaking back into the car this weekend.
 

Attachments

  • 20240531_180901.jpg
    20240531_180901.jpg
    383.7 KB · Views: 17
  • 20240531_180945.jpg
    20240531_180945.jpg
    229.5 KB · Views: 17
  • 20240531_181949.jpg
    20240531_181949.jpg
    195.5 KB · Views: 15
  • 20240531_183846.jpg
    20240531_183846.jpg
    372.8 KB · Views: 14
  • 20240531_181035.jpg
    20240531_181035.jpg
    286.6 KB · Views: 14
  • 20240531_181303.jpg
    20240531_181303.jpg
    171.5 KB · Views: 14
  • 20240531_183001.jpg
    20240531_183001.jpg
    291.5 KB · Views: 14

LilCop2002

SHO Member
Joined
May 25, 2019
Messages
162
Reaction score
177
Location
In the South.
Pics 28-29.

Though I still have some more work to do before closing this project out I wanted to make a few notes:

1) This entire process is NOT hard to do although it can be a bit time consuming.

2) Based upon your needs, level of knowledge, depth of cleaning, and patience this can be done in your driveway, a garage, or a parking lot.

3) (More for me than you...) Be patient with the process (and yourself) as things are likely not going to align, a screw might roll out of reach, your kids may be jackasses, and the light headliner you just cleaned may get dirty again.

4) Clean the corners and deep edges of the front/back windshields before you reinstall parts as it helps reach areas inaccessible.

5) I took this time to clean the sides of the middle console and the other parts not easily accessible.

6) The front A-pillar covers were a bit tight to get back into place but looking at the 2 tabs that fit into the dashboard recess helped get it right. I had to stand outside the car to align them.

7) Though my prep was subpar at best, I took the time to paint the wiper arms since they were removed to check the cowl. I went with an ultra matte to potentially help reduce glare; they may not be body shop quality but they sure beat the sun/road beaten black and silver option.
 

Attachments

  • 20240602_184609.jpg
    20240602_184609.jpg
    264.1 KB · Views: 13
  • 20240602_184558.jpg
    20240602_184558.jpg
    260.3 KB · Views: 20
Joined
Sep 6, 2023
Messages
870
Reaction score
1,078
Location
Florida
Can I ask how you got the headliner out? Ive heard the windshield has to come out to get it in and out of the car. was there enough room to slide it out a door with the seats out? I only ask because someone was asking about getting rid of a smoke smell @javon7065 and they were told the headliner couldnt be replaced easily. unbolting the front seats is a lot easier than cutting out the glass if that was the case. definitely a good thread for anything to do with interior service
 

LilCop2002

SHO Member
Joined
May 25, 2019
Messages
162
Reaction score
177
Location
In the South.
Remember that I stripped everything (shy of the middle console and dashboard) and left the headliner for last.

I angled mine from the steering wheel across to the rear passenger door where I removed it. The fit was tight, required some maneuvering, had me concerned about damaging it by compressing (slight bending needed), and carefully watching the different contours of the door/headliner.

Based on how I had the car positioned in the garage, I had to go this direction. It likely would have been better to go passenger side dashboard to driver rear door as it would eliminate the steering wheel as an obstacle.
 

LilCop2002

SHO Member
Joined
May 25, 2019
Messages
162
Reaction score
177
Location
In the South.
Additional notes:

8) Getting the wiper arms on/off are tough... especially if you are short... even if the car is lowered. A stool may be necessary... I'm used to it but neglected to use one and caught myself cursing.

8a) If possible, mark the arms to know how to orient them when going back on.

8b) Once you get the nuts off the wiper arms, do NOT use anything crazy to try to pull the arms off as you risk breaking the windshield or the windshield cowling.

8c) The arm with the angle goes passenger side. The straighter arm goes driver side.

8d) The shorter wiper blade goes passenger side. The longer wiper blade goes driver side.

8e) If you forget 8a, 8c, or 8d, you'll know it when you get them on and the wiper blade tip is 3" above the roofline when activated. (Was so distracted with a situation on Thursday night I forgot which was which...)

9) There are "I" markings on the bottom of windshield. The wiper blades should rest in the top and bottom of the "I" which helps with your reinstallation of arms and alignment of blades.

9a) Mine are lower than the "I" as I wanted to get car road worthy in the event we needed it and because I plan on replacing the cowl and they'll have to come back off soon.

9b) A thread I read somewhere said it is better to place the arms lower than higher as it reduces airflow restrictions and chattering of blades/arms.
 

Attachments

  • 20240605_100222.jpg
    20240605_100222.jpg
    313.6 KB · Views: 11
  • 20240605_100235.jpg
    20240605_100235.jpg
    267.5 KB · Views: 9
Last edited:

Zpak

Es Aich Oh!
Joined
Jun 1, 2017
Messages
1,978
Reaction score
2,530
Location
The region, Indiana
I ran through a couple of posts in this thread when it started but didn’t follow it as it progressed at the time. Now that I just started getting dripped on after rain it’s relevant and exactly the knowledge I was hoping to gain. Thanks @LilCop2002

I’ll tackle clearing the drains this weekend and hope that is the solution and won’t result in my interior looking like Jordan’s.
 
Back
Top