MHW100
SHO Member
Finally pulled the plug and purchased a 2018 CPO with a PP and burgundy paint as options. It has 6k on it and I added another 1k driving it home from the Ford dealer. What a great ride home through the mountains!!! Cost was $27k before tax.
Didn't think I would really like the burgundy but now that I have its a deep, rich color - I can see why its an option.
So happy with the car so far.
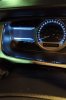
Only issue that I've found is the display plexiglass has some scratches. I'll post a pic and maybe one of you pros can advise if it can be fixed without having the local dealer replace it.
There is a squeak somewhere in the cockpit when you tromp on it as well and sounds like something shifting from the torque. Not sure if anyone else has it and certainly not the end of the world. I don't think its from the window shade.
Anyways, I wanted to thank this forum for all of the interesting threads and help I've received.
Didn't think I would really like the burgundy but now that I have its a deep, rich color - I can see why its an option.
So happy with the car so far.
Only issue that I've found is the display plexiglass has some scratches. I'll post a pic and maybe one of you pros can advise if it can be fixed without having the local dealer replace it.
There is a squeak somewhere in the cockpit when you tromp on it as well and sounds like something shifting from the torque. Not sure if anyone else has it and certainly not the end of the world. I don't think its from the window shade.
Anyways, I wanted to thank this forum for all of the interesting threads and help I've received.