2010 SHO engine removal procedure needed

Disclaimer: Links on this page pointing to Amazon, eBay and other sites may include affiliate code. If you click them and make a purchase, we may earn a small commission.

MustangKR500

Member
Joined
Feb 5, 2019
Messages
25
Reaction score
36
Location
Mi
Good Evening Everyone,

Just picked up my first SHO.
2010 Non PP.
It has low compression in cyl 4 at 172k.
I have an engine from a 2012 MKS with only 9k ready to swap. I have experience pulling an EB f150 engine, but am looking for a write up on the proper procedure for the SHO. Can it come out the top?
I am well equipped but do not have a vehicle hoist in my shop.

Thanks!
 

SHOdded

SHO Member
Joined
Dec 25, 2011
Messages
9,045
Reaction score
4,390
Location
Maryland
Scott Milligan is our most recent venturer into this foray, but a few folks on this forum have replaced engines, so there is experience to be had.

Dropping through the bottom is the factory way, not impossible to pull out the top, it's been done.

And welcome!
 

MustangKR500

Member
Joined
Feb 5, 2019
Messages
25
Reaction score
36
Location
Mi
Thank You,
I am going to attempt removal out the top.
I will post about it after.

Just an FYI to everyone:
my engine has a cylinder with 40-50 psi and it will drive down the road decent and not trigger active misfire. IF you are going to buy a SHO check compression on all cylinders it's Easy insurance. I could sell this car as it is now and play dumb about the check engine light (or shut it off) and someone would drive it home thinking it probably just needs a tune up! I bought it knowing it had low compression, turns out a gearhead tune was on the car without any gauges and it detonated the crap out of #4. Engine is at 173k
 

Jeff2017

SHO Member
Joined
Jan 29, 2017
Messages
810
Reaction score
516
That is not a good advertisement for Gearhead. A lot are jumping on their tunes now.
 

MustangKR500

Member
Joined
Feb 5, 2019
Messages
25
Reaction score
36
Location
Mi
That is not a good advertisement for Gearhead. A lot are jumping on their tunes now.
I can't say it definitively caused the problem but that cylinder looked like 40 grit sand paper from detonation. Previous owner was meticulous with maintenance.
The tune was the only mod.
 

MustangKR500

Member
Joined
Feb 5, 2019
Messages
25
Reaction score
36
Location
Mi
Confirmed: Engine pull from top is very doable. I did it in about 12 hours taking it easy and careful.
Difficulty Levels 1-10
Physical: 5
Mental/Technical: 6
Special Tools: 4
Disassembly ammount: 6
Driveway Mechanic: Possible but not ideal. Garage and concrete floor recommended.

This pull overall was far easier than pulling one (EB 3.5) out of the 2011 F150

I was able to do this without ANY suspension disassembly and without disconnecting the AC !Engineoutlowsize

I will post a full writeup soon!
 

MustangKR500

Member
Joined
Feb 5, 2019
Messages
25
Reaction score
36
Location
Mi
20190209 160727 1612x1209Remove Battery Tray And Air Box 20190209 160919 1612x1209 20190209 161729 1612x1209 20190209 162135 1612x1209 Disconnect smaller cables from main battery cables both pos and neg think they have a 6mm nut on them. This allows you to move cables and wiring out of the way20190209 162938 1209x1612 Disconnect Transmission Connector by depressing the release tab and swinging the grey lever. Be careful and dont pry on the connector! Its a two part release, when you get it, it will swing easily20190209 162950 1612x1209 20190209 163316 1612x1209 Start Removing Turbo Tubes on front turbo.20190209 174624 1612x1209 Remove Hood by unbolting hood from hindges (with help) disconnect hood struts by taking metal clip off at top and gently prying off the ball.20190209 174629 1612x1209 20190209 214616 1612x1209
Next post to continue (max 10 photos per post)
 

MustangKR500

Member
Joined
Feb 5, 2019
Messages
25
Reaction score
36
Location
Mi
Page 2 of Engine Pull

Get out a few lengths of flat head screw driver and remove this turbo tube. One of the clamps is accessed from the underside, its tight but doable.
20190209 220309 1209x1612 Remove the Shift Linkage by unlocking and sliding the yellow connector to the side, then pop off the linkage.

Then Remove Starter
20190209 222155 1209x1612
20190209 224113 1209x1612
Remove Spash shield under bumper

Also remove the black plastic cover running over radiator and hood release area under hood

Then Drain Radiator by using a 6mm hex to open the drain (dont completely remove it)
20190209 224645 1612x1209
Remove front bumper by unbolting it from the hood release area, wheel well screws etc. It then can be genly pushed and popped off the fixed plastic connectors located on the fender near the headlight cut outs. Be gentle and you will see how they pop off.
20190209 233956 1612x1209
Unplug and remove airbag sensors in front metal bumper area
Unbolt front metal bumper
Drill out the 4 spot welds that hold the bumper on ( i used a quarter then a half inch bit and they were not too hard to do.

20190210 000955 1612x1209
To be continued
 

Attachments

  • 20190209_223123-1612x1209.jpg
    20190209_223123-1612x1209.jpg
    367.6 KB · Views: 79
  • 20190209_222638-1612x1209.jpg
    20190209_222638-1612x1209.jpg
    491 KB · Views: 75
  • 20190209_224655_001-1612x1209.jpg
    20190209_224655_001-1612x1209.jpg
    358 KB · Views: 69

MustangKR500

Member
Joined
Feb 5, 2019
Messages
25
Reaction score
36
Location
Mi
Page 3 of engine removal

Unbolt radiator core support,
There are 4 bolts up top, and two down below on each side.

This will allow the radiator an coolers rock forward making mor clearance for disconnecting hoses.
20190210 004017 1612x1209
Remove trans cooler lines at the cooler, unbolt the bracket and swing them to the side
20190210 144200 1612x1209
Unclip AC/transmission cooler
Swing it gently to the side being cautious
Of AC line (you will unbolt some other brackets later to allow it to swing further out of the way.
20190210 150238 1612x1209

Remove hood release
20190210 145826 1612x1209

Unplug fans and other wiring fron radiator area

Remove clip and pull off drivers side radiator hose and intercooler piping

Remove passenger side radiator and intercooler hoses.

Remove and set the whole core support, radiator and intercooler aside as one unit.
20190210 150345 1612x1209
Remove headlights
20190210 150354 1612x1209
Remove coolant bottle with lower hose attached.
20190210 144851 1209x1612
Obviously along the way i didnt detail removal of every tube, hose and connector :)
 

Attachments

  • 20190210_152226-1612x1209.jpg
    20190210_152226-1612x1209.jpg
    279.9 KB · Views: 68
  • 20190210_010557-1612x1209.jpg
    20190210_010557-1612x1209.jpg
    524.7 KB · Views: 71

MustangKR500

Member
Joined
Feb 5, 2019
Messages
25
Reaction score
36
Location
Mi
Page 4 of engine removal
Unhook all of the connectors and ground wire bolt still holding the front harness in place.

Pull harness all the way to drivers side and hang it out of the way.
20190210 154736 1612x1209
Remove serpentine belt
Unbolt AC Pump, i had to use two nuts torqued against each other to get the bottom stud out of the AC pump.
20190210 152226 1612x1209
Remove AC line anchors in this area which will allow you to gently swing the AC pump and pipes to the passenger side just past the fender (our of the way) without losing the ac charge.
20190210 154758 1612x1209 This pic shows how i arranged the AC pump and pipes just out of the way. I ended up putting a rag between one of the pipes and the tip of the fender to prevent a scratch.

20190210 154751 1612x1209
DISCONNECT Fuel lines BE CAREFUL ABOUT FUEL, SPARKS, FIRE AND DEATH!
Only a few drops came out of mine.
Cover your fuel lines on engine and line ends to prevent contamination.
The red and other colored plastic clips on the fuel disconnects are very fragile.
20190210 172150 1612x1209
Remove this line.
20190210 173102 1612x1209
Unhook Heater Core lines and fold them gently toward firewall and stick them like the pic shows
20190210 173849 1612x1209
20190210 173913 1612x1209
IF you have not already done so, sorry i forgot to tell you to lift the car and put it on proper jack stands, chock the tires and set the parking brake. DO ALL OF THIS WATCHING OUT FOR DEATH AND OTHER BAD STUFF!

REMOVE passenger tire and DO NOT USE IT AS A JACK STAND I always throw the tire under the car as a just in case last ditch safety measure as well as leaving the jack somewhwere under the car as another failsafe.

20190214 162118 1612x1209
Remove two bolts holding the axle carrier turn wheel left and right if you need to get access.

20190214 162134 1612x1209
To be continued
 

MustangKR500

Member
Joined
Feb 5, 2019
Messages
25
Reaction score
36
Location
Mi
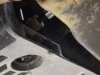
Remove the three bolts connecting the cat converter to the turbo, this allows the pipe to drop out of the way of next step.
Access to these is through pass wheel well. These take a ton of torque i had to use a swivel and large braker bar. My impact couldnt touch 2 of them. They came out as studs not nuts.20190214 204114 1612x1209


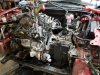
Go under the car to the rear of engine near firewall and take these three bolts out of the aluminum mount. I did end up taking out the two bolts not pictured that connect this mount to the PTU/transmission. Gear Wrench style hand wrench 13mm helps get these out.
I found out that if i oy did the 3 pictured the mound would hit the turbo oil pipe as it was lifted. I just couldnt get a picture of them. I actually left the one bolt in the steel bracket to turbo mount. No trouble in this area during the pull out.
20190218 160229 1209x1612
Out of order, but this is how i broke the cat bolts loose, had to turn wheels left to get enough clearance.
20190214 204120 1612x1209
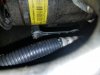
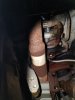
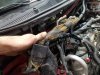
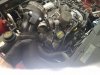
While under the car you have to unbolt a 6mm nut and unhook two connectors on the electric steering rack, these are kindof hard to reach and pinch hard enough to release, but it can be done from the underside best. Once done you can pull this harness up the drivers side by the battery tray. You have to unbolt and disconnect the ground and little black box in the 2nd pic on the rear engine head.
Its part of the wiring that has to come up the drivers side from the steering rack.
20190214 210054 1209x1612
20190214 210604 1209x1612
Remove plastic flywheel access cover
Two plastic screws.
20190214 212919 1612x1209
ROTATE engine with screw driver through starter hole.
Remove each of the three torque converter bolts.
I used the screw driver jammed in between flywheel and TC to hold it whole i unbolted the TC bolts. This is a real gread design super access!!
20190214 213102 1612x1209

Now unbolt the front Cat from the front Turbo, you have to take the oxygen sensor off to get a bolts.

Unplug Any oxygen sensors I didnt detail

AFTER this check for anything still connected I may not have detailed.

Last post will detail final pull procedure
 

Attachments

  • 20190218_160157-1209x1612.jpg
    20190218_160157-1209x1612.jpg
    295.6 KB · Views: 83
  • 20190214_210514-1612x1209.jpg
    20190214_210514-1612x1209.jpg
    576.7 KB · Views: 87
  • 20190214_220528-1612x1209.jpg
    20190214_220528-1612x1209.jpg
    448.7 KB · Views: 80

MustangKR500

Member
Joined
Feb 5, 2019
Messages
25
Reaction score
36
Location
Mi
Final steps
Go under plastic cowl at firewall and unhook the main engine harness
You can pop a couple plastic screws and a clip and get it from the passenger side without fully removing plastic cowl
20190214 220528 1612x1209

NEXT
You have to set up a front lift bracket.
I used one off the incoming motor, the lift hooks fit on the front or back, they are the same.

Hook up your cherry picker with a load leveler if you have one. Put gentle upward pressure on engine.

Unbolt three nuts that are on the long studs on the front engine mount.
Then unbolt the mount from the body
I Broke the bolt closest to the side of the car, i should have heated that one. These came out very hard. Do not use an impact on these, if they are stuck, heat them or slowly work some pb blaster into them going in and out a quarter turn and slowly work them out. If you break the one i did, it will be pretty easy to fix with the right tools.
After the whole mount is out its time tk take out the bell housing bolts.
All were accessible.
Slide engine toward passenger side and there is plenty of clearance to lift motor.
No support is needed under trans.
Double check then tripple check as you lift that you didnt miss any connectors.

Done lol
The picture taking probably accounts for one of my 12 hours. If i did it again im sure i could shave 4+ hours from my cautious documenting MT dew drinking pace
20190218 192432 1612x1209
Engineoutlowsize
 

Attachments

  • 20190218_192432-1612x1209.jpg
    20190218_192432-1612x1209.jpg
    622.6 KB · Views: 96
  • 20190214_210514-1612x1209.jpg
    20190214_210514-1612x1209.jpg
    576.7 KB · Views: 90

MustangKR500

Member
Joined
Feb 5, 2019
Messages
25
Reaction score
36
Location
Mi
Damn! That looks like a lot of work.
Its not that bad, most of it is just light disassembly. So much of that front end comes off with so few bolts its crazy.
This whole pull was probably only 50-60 nuts and bolts total! Lots of hoses and electrical connectors and easy stuff. A guy with moderate experience will find this to be a fairly easy engine to remove because 99% of it come apart like butter
 

MustangKR500

Member
Joined
Feb 5, 2019
Messages
25
Reaction score
36
Location
Mi
This is a real eye - opener!

The rad saddle unbolting and removal really opens up the space.

From now on, I will think of this procedure as "out the front" removal.
You could do this pull just removing radiator fans, but that wasnt so clear when I started. Plus i wanted to be careful amd not break anything since I was kindof paving the way from a documenting standpoint
 

luigisho

SHO Member
Joined
Nov 2, 2001
Messages
13,270
Reaction score
5,145
Location
va beach,va
You going to pop the oil pan and/or oil pump screen and see if there is stuff laying around in there? I'd be curious what scored up the cylinder.
 

shaker281

SHO Member
Joined
Mar 6, 2011
Messages
452
Reaction score
186
Location
USA
Awesome write-up! Thank you. Great pics. Yes, looks like an hella job from pics, but probably much easier than it might appear with parts strewn all over!
 

MustangKR500

Member
Joined
Feb 5, 2019
Messages
25
Reaction score
36
Location
Mi
UPDATE: PROJECT COMPLETE

IT LIVES! Runs great.

Here are some side notes.
I used an engine from a 2012 lincoln w/ecoboost direct bolt in.
2012 engine has updated timing chain which is far more robust.
I used a low mileage turbo from a 2015 explorer on the right (rear)
FYI the newer turbo's lack the ears to connect the support brackets so
I took a chance and used the updated cast exhaust manifold from the 2015 Explorer on just
the Right side as the porting looked to be the same size and I know the cast manifolds were
developed to simplify and cut cost. One HUGE benefit of using the cast manifold is that by
eliminating the support brackets on the right hand turbo (firewall side) gives excellent access
to the otherwise hard to reach engine to transmission reinforcing bracket. Also in the future a turbo replacement
would be far simpler.

More Points
-GET A FACTORY SERVICE MANUAL if at all possible (I hunted alot for torque values), and borrowed many from an F150 FSM I already have. Thanks to certain members on here, I was able to get the rest.
-Ford Dealers ARE USELESS for torque values...the have a hard enough time getting part numbers.
-Ford Dealers will not have any useful gaskets/parts in stock. Plan to wait 1-2 business days on each part order.
-2012 engine is direct bolt in for 2010 SHO
-2015 Explorer Turbo Works If You Also Use The Explorer Exhaust Manifold
-If your front engine mount bolts are crazy hard to remove HEAT THEM.
-If you break a motor mount bolt weld a nut to the bolt shank and while hot it will come out like butter
-The Turbo Oil Supply Ports on the engine are super easy to break if you have to remove them for any reason
-The Exhaust Manifold To Head Torque specs IMO are a bit low so be sure you follow the pattern and double check all studs a 2nd time after you complete the pattern.
-Although not ideal, I have been successful in re-using the metal exhaust manifold to head and manifold to turbo gaskets without issue. I have done this twice due to time constraints on ecoboosts. Thousands of miles no problem. I would not re-use the turbo oil drain gaskets even though they are metal as an oil leak is bad news.
-The latest turbo oil drain tubes have extremely tough rubber o-rings that are dam near impossible to get into the block. I literally had to grasp the tube with vice grips at the ****** and tap with a hammer on the jaws of the vice grips which left grooves it the tube albeit superficial, it made me mad that they made them so hard to install.
-When you remove the passenger side axle carrier that supports the cv axle shaft with a mount on the block (Two bolts) you should put something under the axle shaft to support so the weight doesn't put pressure on the seal in the side of the PTU. I did not do this initially and my cv axle pulled out a little and I started losing trans fluid. Fortunately it didn't damage my seal, but it easily could have.
-When Re-assembling, leave the cats unbolted until the very end when you are ready to put in radiator and front fascia back on. You will find several times you need access to the rear side of the engine that can only be had if the cat is hanging unbolted.
-Break all 4 o2 sensors loose and re tighten just in case you need to replace them. much easier to do while they are hanging down. Very often after an engine blows the upstream 02 sensors go out shortly after.
-If you can, clean all of your turbo piping then use air hose to blow out any moisture. I used a parts washer with off road diesel fuel which works great for chasing out oil and dust/sand that gets into the system. Be sure you blow it out really well!!
-While the Engine is out change your PTU fluid, and if you have any doubt, change your torque converts (its literally right there, and you would hate yourself if you did an engine and missed the opportunity to do the TC or the PTU fluid. Address any PTU leaks at that time. Also Check your Rear Drive Shaft hasn't blown its boot all items that are supremely easier to do with engine out.
-The Crank Pulley Bolt is Torque To Yield Meaning it needs to be replace every time its removed.
-If you purchase a used engine getting a newer 2012 engine will get you the updated timing system, if not, and even still, double check the timing chain tensioner. It clicks out more and more teeth as the chain stretches, I believe my replacement 2012 engine with 9,000 miles had 2-3 teeth showing, my outgoing 2010 engine with old timing chain that looks like a pedal bike chain had like 5 -7 teeth showing. It had no noticeable chain noise, but it must have been getting close to that issue at 173,000 miles (Pretty sure the engine had a head replaced at some point) which would likely mean it was on its 2nd timing set.
-The AC pump bottom stud is hard to get out, use a 2nd nut torqued against the first to help take the stud out, you have to take the stud.
-IF YOU ARE CAREFUL you can take the AC pump and condenser and set them to the passenger side and not have to release the charge.
-Take lots of pictures as you go to note the routing of wiring on the back of the engine.
-Put bolts partially back in holes after removing each of the many ground cables around the engine and body
-Bagging bolts and labeling by part or assembly will help anyone, but particularly if this is your first time pulling an engine.
-The whole front core with radiator, fans etc comes out as one unit.
-Check turbo piping carefully, i found one of my pipes had a broken plastic collar that holds an end to the rest of the pipe which may have been leaking.
-Keep you old engine until the very end, its a gold mine for replacement parts especially if your new used motor came from an accident vehicle.
-If your donor vehicle was in an accident like mine was, make sure the exhaust manifold is not bent. I found my front manifold was bent about a quarter inch because the support bracket wouldn't line up with the hole on the turbo. Also if accident damage, check the turbo drain tubes the one on the bent manifold side was also bent so the ****** was u shaped a little which would have leaked terribly.
-IF YOU REMOVE INJECTORS DO NOT LOSE ANY OF THE INJECTOR O-RINGS!! THEY COST NEARLY AS MUCH AS NEW INJECTORS! If you are careful you do not need to replace these o-rings.
You have to **** the injector o-rings with oil before putting the fuel rails back on and put them on flat and equally across all 3 injectors. The black plastic circle gasket at the top of the injector goes on the injector with the groove facing up towards the fuel rail. (experience on injectors from F150 ecoboost Job) Take your time, the injector rails are hard to get in correctly, but as you manipulate the wiring they will go in eventually. Don't loose your cool or it will cost you big.
-Use FORD Brand Coolant of the current spec, lots of concerns about other coolants causing plugging issues. JUST SAY NO TO GM DEXCOOL Screw that clotted mess, i don't care if it supposedly meets spec...
-Use 5W-30W synthetic, seems ford moved to that spec with no other internal changes even if your cap says 5w20w IF YOU USE CHEAP OIL IN ECOBOOST ENGINES or Go over 5k miles between changes YOU WILL REDUCE ITS LIFE. TURBO ENGINEs RUN HOT.. USE SYNTHETIC ALWAYS. I Love Mobil 1 Full Synthetic.

This Job took about 25-30 working hours the first time, about 20 Mountain Dew's, and was truly only a moderate challenge for me.

I hope my posts encourage people to take on the GEN4 SHO repairs like they have previous Generations.

Good Luck!!
 

MustangKR500

Member
Joined
Feb 5, 2019
Messages
25
Reaction score
36
Location
Mi
That is not a good advertisement for Gearhead. A lot are jumping on their tunes now.
I would like to update my statement about the gearhead tune.
Yes Detonation Killed This Engine & Yes A Gearhead Tune was "part of the cause"
HOWEVER:
I did find the Spark Plugs Were not pristine as they should be when pushing a high tune.
The engine had a failing turbo on the opposite bank from the low compression cylinder.
The engine was near the maximum for chain stretch and was at 173k which is higher than 95%
of the EB's on the road.
THE CAR WAS NEVER DYNO'd or checked professionally to see if the engine was liking the tune.

I think the combination of a hot tune with subpar plug condition, an aged motor, and not testing was just more than it could handle. I think if you have a higher mileage SHO or are not planning on bringing all maintenance to 100% you should just enjoy the 365hp it so generously provides out of the box..
 
Back
Top