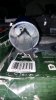
I may have put this somewhere else already but I basically went with the $18 can off ebay.
- Cut it open after making stripes along sides with sharpie to better re-align during re-sealing; 1 stripe on one side, 2 on opposite side
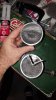
- Got rid of the little clear sight tube and replaced each hole with a short bolt trimmed down, each with rtv
- Stuck slightly oversized piece of hardware cloth, concave down into bottom of can (drain plug end) to keep steel wool from soaking in fluid over time.
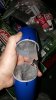
- Affixed a 1x1" piece of aluminum angle bar, 1/20" thick, over inside vacuum port, isolating it from the rest of inside of can, long enough to touch hardware cloth. This is what makes the air travel full length of can.
- Stuck in some steel wool to both halves of can. (FYI - making the initial cut in can lower down helps here - you only have to put steel wool in the top portion before sealing, whereas my cut was in the middle and so I had to put some in both sides).
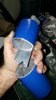
- Epoxied the bitch closed, and added rtv to drain plug and inlet/outlet ports (all sealing surfaces) - rtv should function like an o-ring with drain plug.
Ran 1/2" line from crankcase baffle box under TB (avoid cable mechanism), down into wheel well to the can (can is fastened to an angled piece of ABS in front of drivers side wheel well, forward of splash guard, using hardware that came with it). 1/2" hose goes to a 1/2" x 3/8" union, then into can, then 3/8" hose from can up to pcv in elbow connected to stock size upper pcv hose to surge tank. FYI, coming out of the baffle box, the 1/2" hose is likely putting a bit of strain on the rear (driver's side) knock sensor. For longevity of this sensor, it might behoove you to find a way to run hose around it, as the stock lower pcv hose did.
That's it! It was a nice little project, and I hope it lasts a while. Here's the finished product:
https://www.dropbox.com/s/7nuxiv10okljxur/Installed.wmv?dl=0
")